Anti-Inflammatory Diet Plan →

  • About
  • Subscribe
  • Skip to primary navigation
  • Skip to main content
  • Skip to primary sidebar
Cotter Crunch

Cotter Crunch

Delicious Healthy Gluten-Free Recipes

  • All Recipes
    • By Diet
      • Dairy-Free
      • Egg-Free
      • Gluten-Free
      • Grain-Free
      • Low-Carb
      • Nightshade-Free
      • Nut-Free
      • Vegan
      • Vegetarian
      • Whole30
    • By Type
      • Breakfasts
      • Casseroles
      • Condiments
      • Desserts
      • Drinks
      • Main Dishes
      • Sides & Salads
      • Snacks & Appetizers
      • Stews & Soups
    • By Method
      • Air Fryer
      • Blender
      • Instant Pot
      • No-Bake
      • Oven
      • Slow Cooker
      • Stovetop
    • Quick Meals
    • With Video
  • Meal Plans
  • Shop
  • Start Here
    • Gluten-Free Eating
    • Anti-Inflammatory
    • More Diet Guides
      • Autoimmune Protocol
      • Anti-Inflammatory
      • Nightshade-Free
      • Vegan
      • Vegetarian
      • Whole30
  • Cookbooks
  • Search
Home › Recipes › By Type › Snacks and Appetizers
50 Comments

Homemade Fruit Roll Ups

Avatar photo

by Lindsay Cotter Published: Apr 24, 2024

Dairy-FreeEgg-FreeGluten-FreeGrain-FreeNightshade-FreeNut-FreeVegan
Jump to Recipe
This post may contain affiliate links (disclosure policy).
Two photos with a text overlay for pinterest. Top photo of ingredients for homemade fruit roll ups. Bottom photo of homemade fruit roll ups.
A photo of 2 rolls of homemade fruit leather with a text overlay for pinterest.

Make these Homemade Fruit Roll Ups with just two simple ingredients and five minutes of prep time. Sweet and chewy, they taste just like your favorite childhood treat! 

Overhead photo of two different colored fruit roll ups. this for later

  • Better For You Homemade Fruit Roll Ups
  • Fruit Roll Up Ingredients
  • How to Make Fruit Roll Ups
    • No Dehydrator? No Problem! 
  • Gluten-Free Kid-Friendly SnackS
  • Common Questions

Better For You Homemade Fruit Roll Ups

Did you grow up eating fruit roll-ups? They were one of my favorite snacks! 

However, store-bought options are made with lots of added sugar, preservatives, corn syrup, artificial flavors, and other undesirable ingredients. Plus, they’re not always gluten-free. So, now we make our own at home instead.

All you need are two ingredients and a few minutes of prep time. Then, you can have nutritious and delicious snacks the whole family will enjoy on hand! They’re perfect to pack for school lunches, in snack bags to take on the go or enjoy as a dessert. 

Up close photo of a homemade fruit roll up.

Fruit Roll Up Ingredients

Unlike store-bought varieties, these tasty gummy treats come together with simple, whole food ingredients. Be sure to scroll down to the recipe card below for the complete details including calories, sodium, fiber, carbohydrates, etc. 

Overhead photo of bowls of pineapple chunks, blueberries and kiwi slices.
Overhead photo of pineapple chunks, kiwi slices and blueberries in a blender.
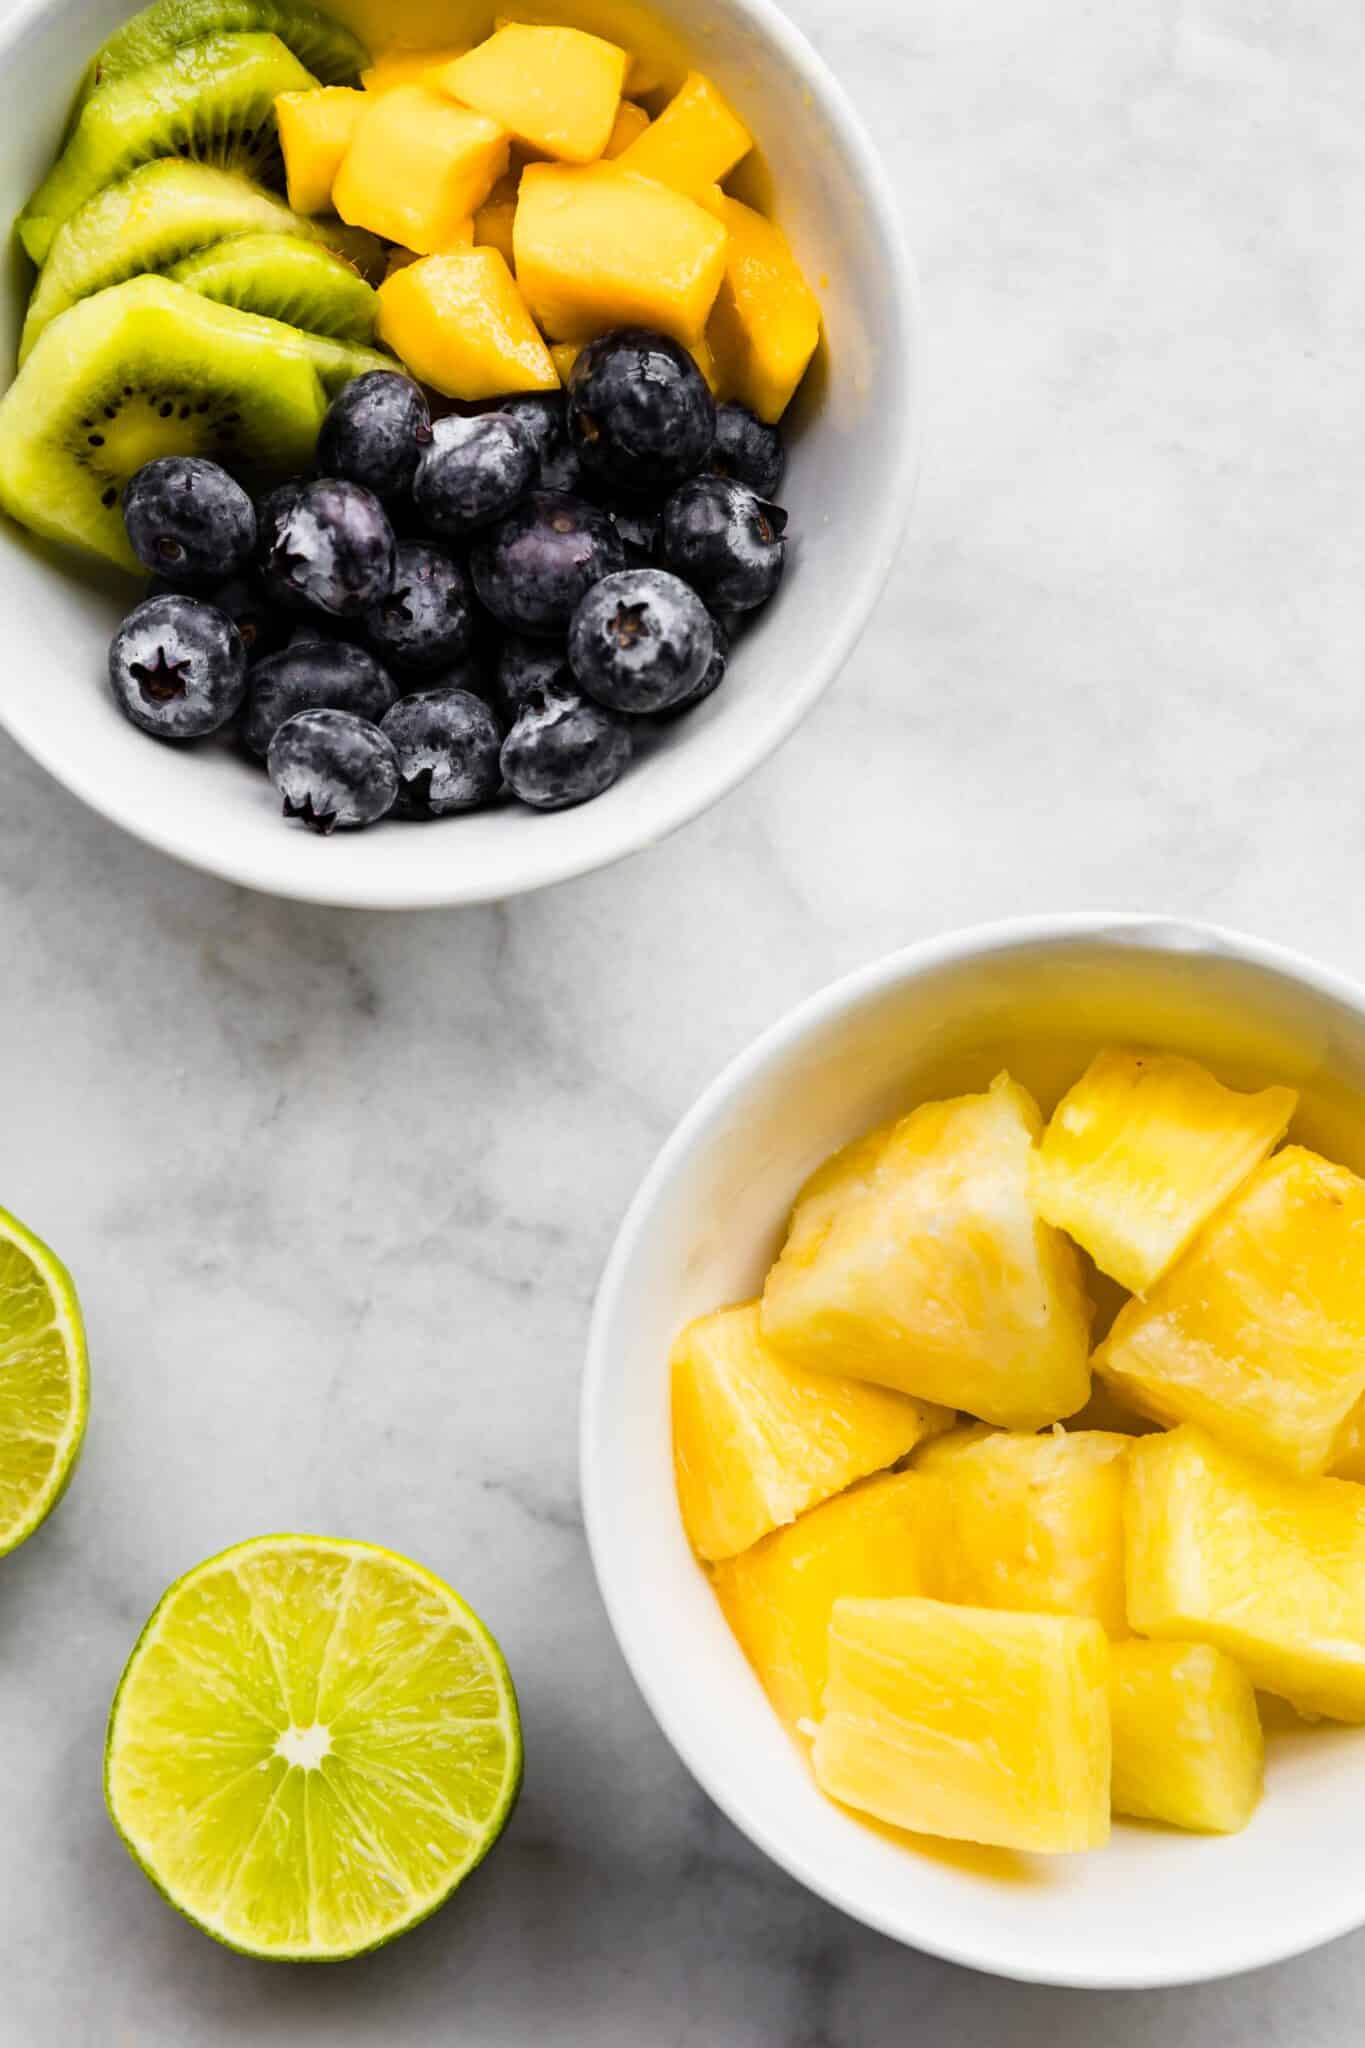
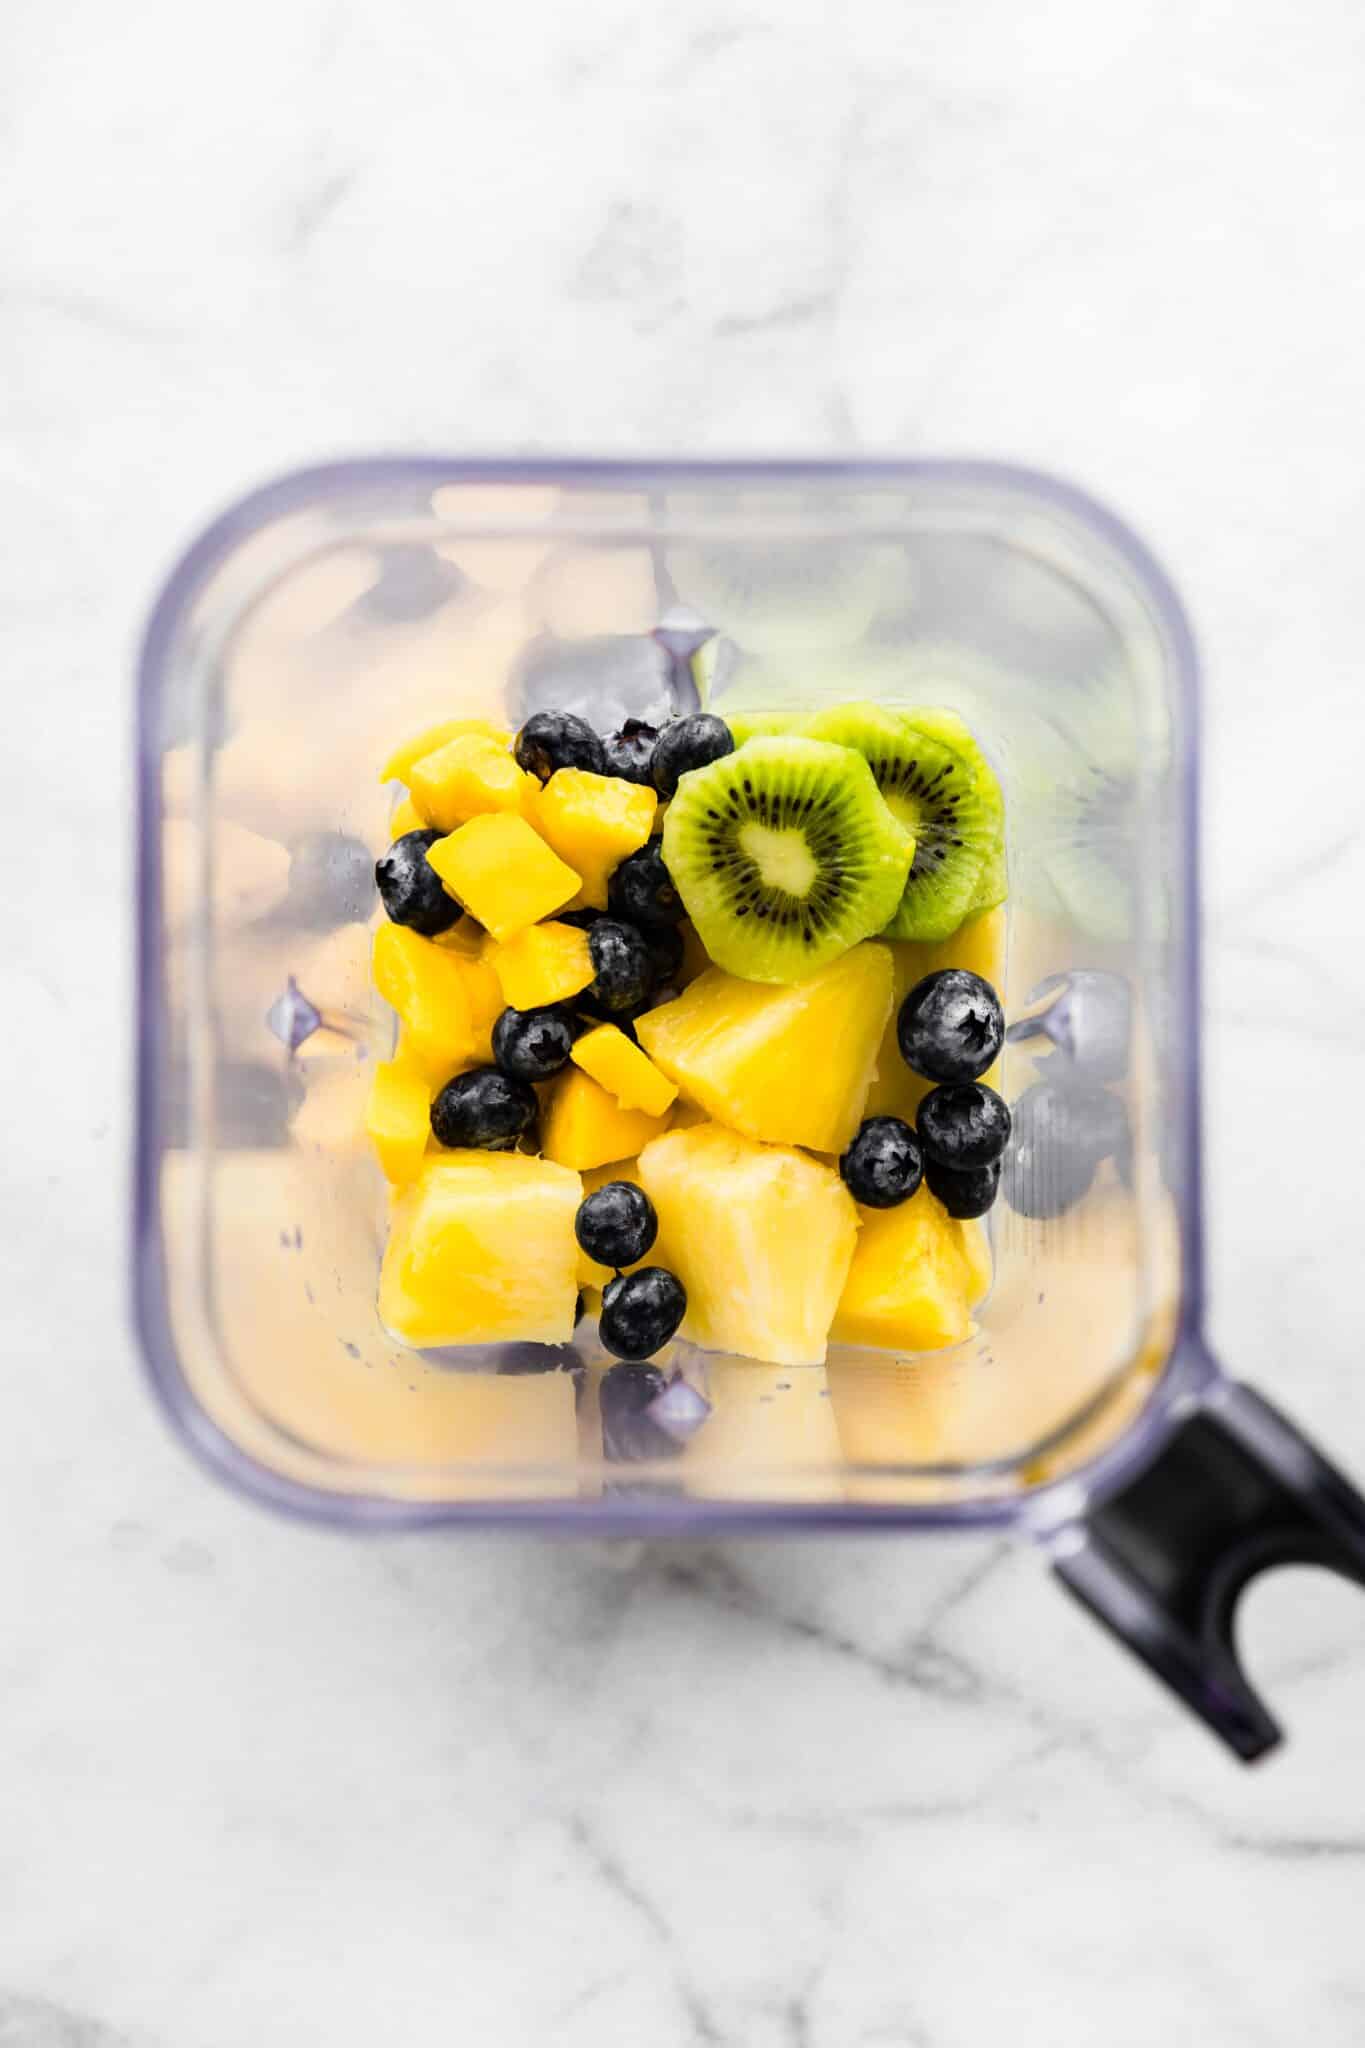
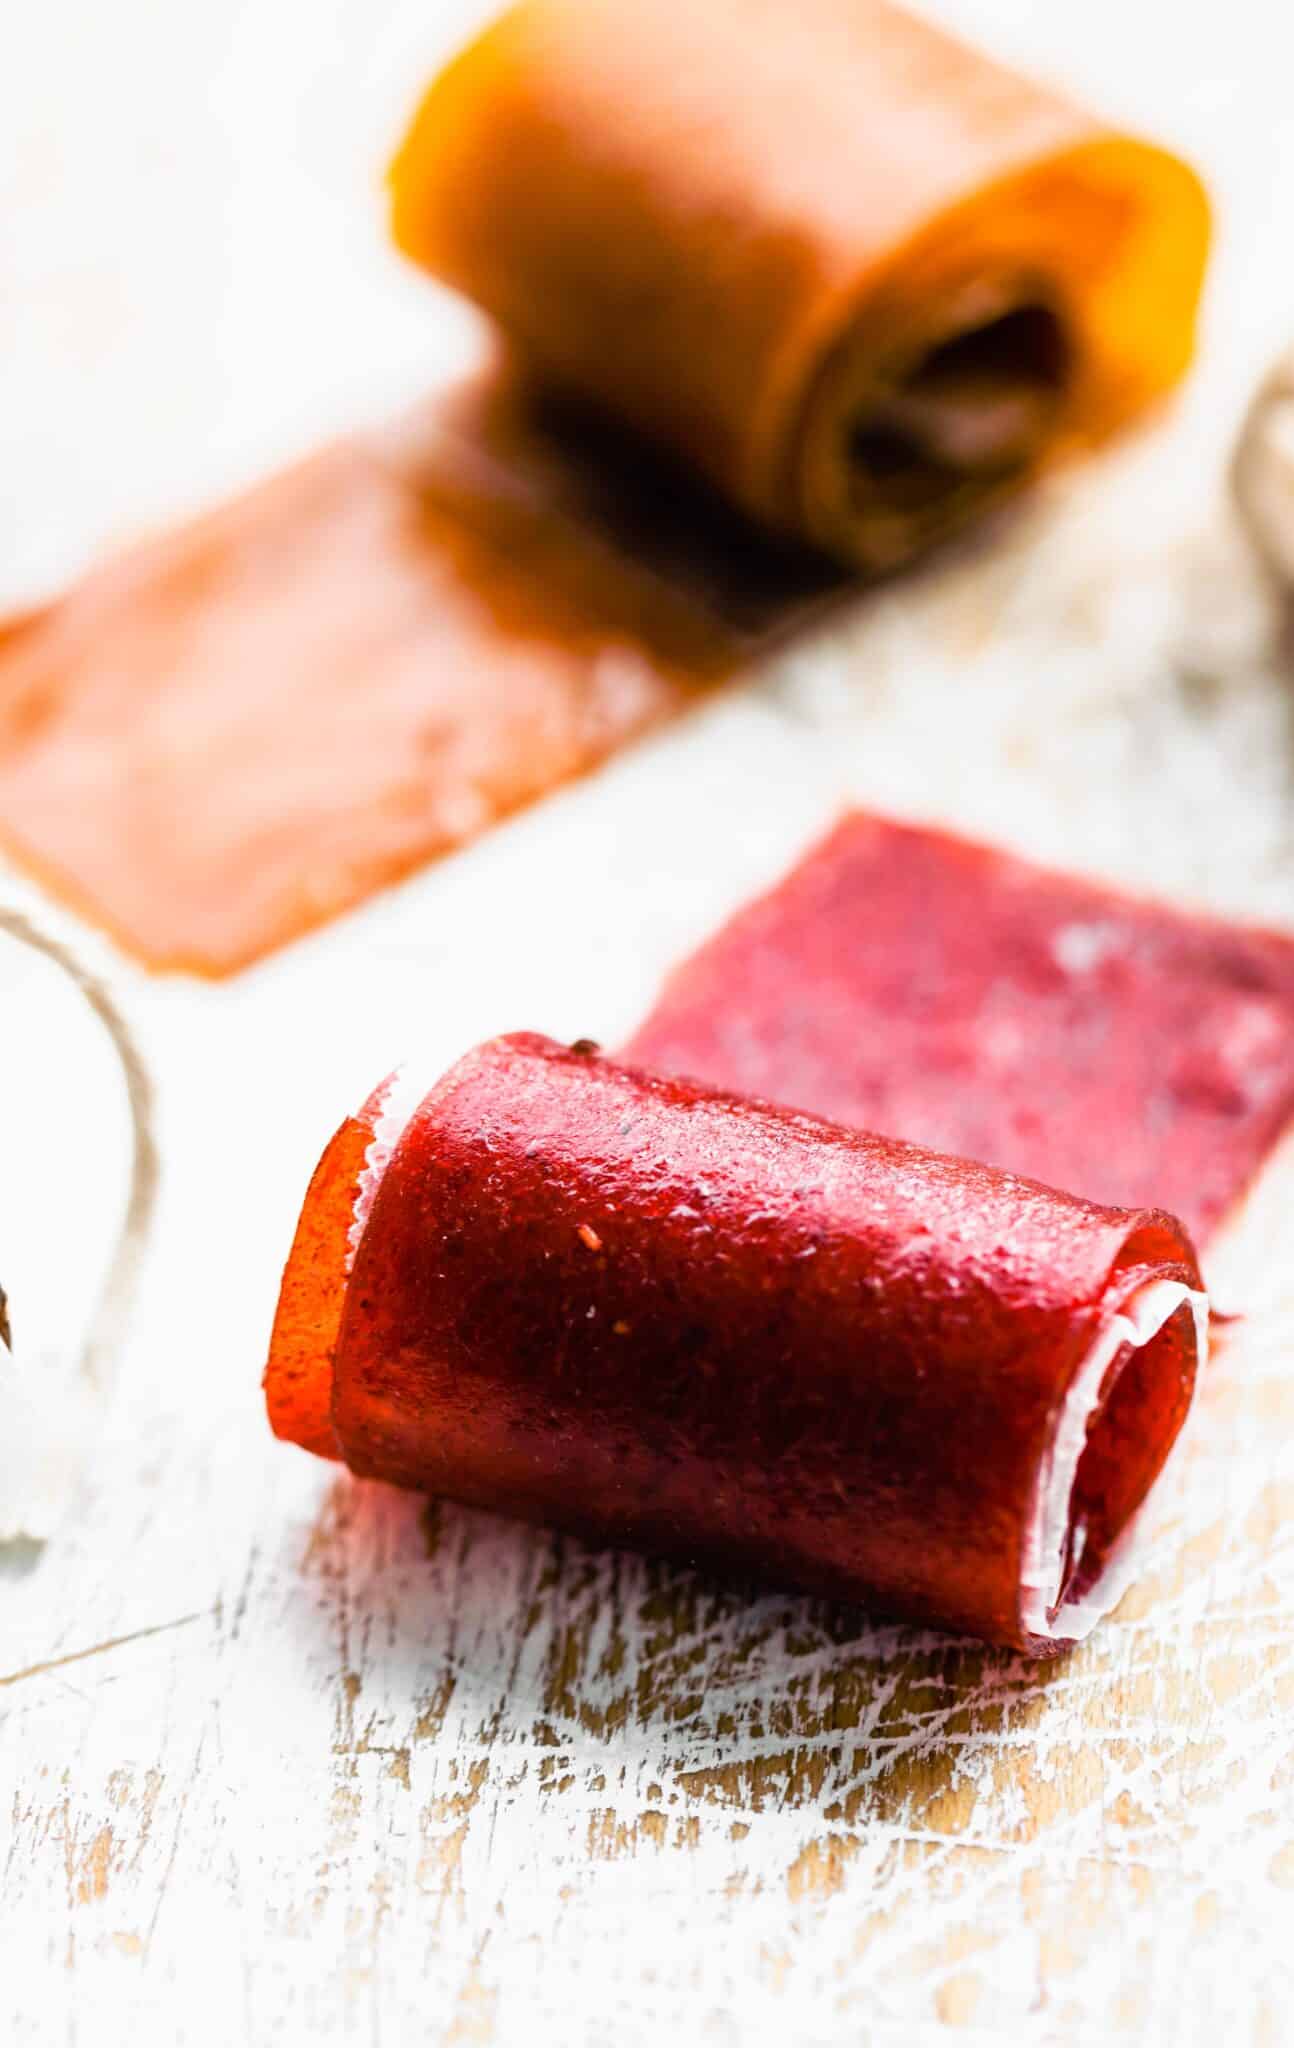
  • Fruit – Use any fruit you like best! Just note that the taste and texture of the roll ups will change based on what you use. Strawberries, raspberries, blackberries, blueberries, mango, kiwi, and pineapple are our favorites. They’re also a great source of vitamins and nutrients like vitamin C! If using berries or kiwi, small seeds will remain unless you strain them in a fine mesh strainer.

Note –  Experiment with your favorite variations to create different fruit roll up colors and flavors.  

  • Sweetener – Maple syrup or honey helps sweeten the fruit and makes the roll ups a little more sticky, like the original treat. 
  • Optional Fruit Juice – We sometimes like to include fruit juice such as pineapple juice or orange juice for added flavor and a smoother texture. We don’t recommend using lemon juice as it’s too sour. 

How to Make Fruit Roll Ups

Before you begin, line a half sheet pan with a silicone mat or plastic wrap. Do not use aluminum foil, parchment paper, or wax paper! Otherwise, the fruit won’t pull off. 

Fresh blueberries and strawberries in a blender.
Overhead photo of a strawberry and blueberry puree in a blender.
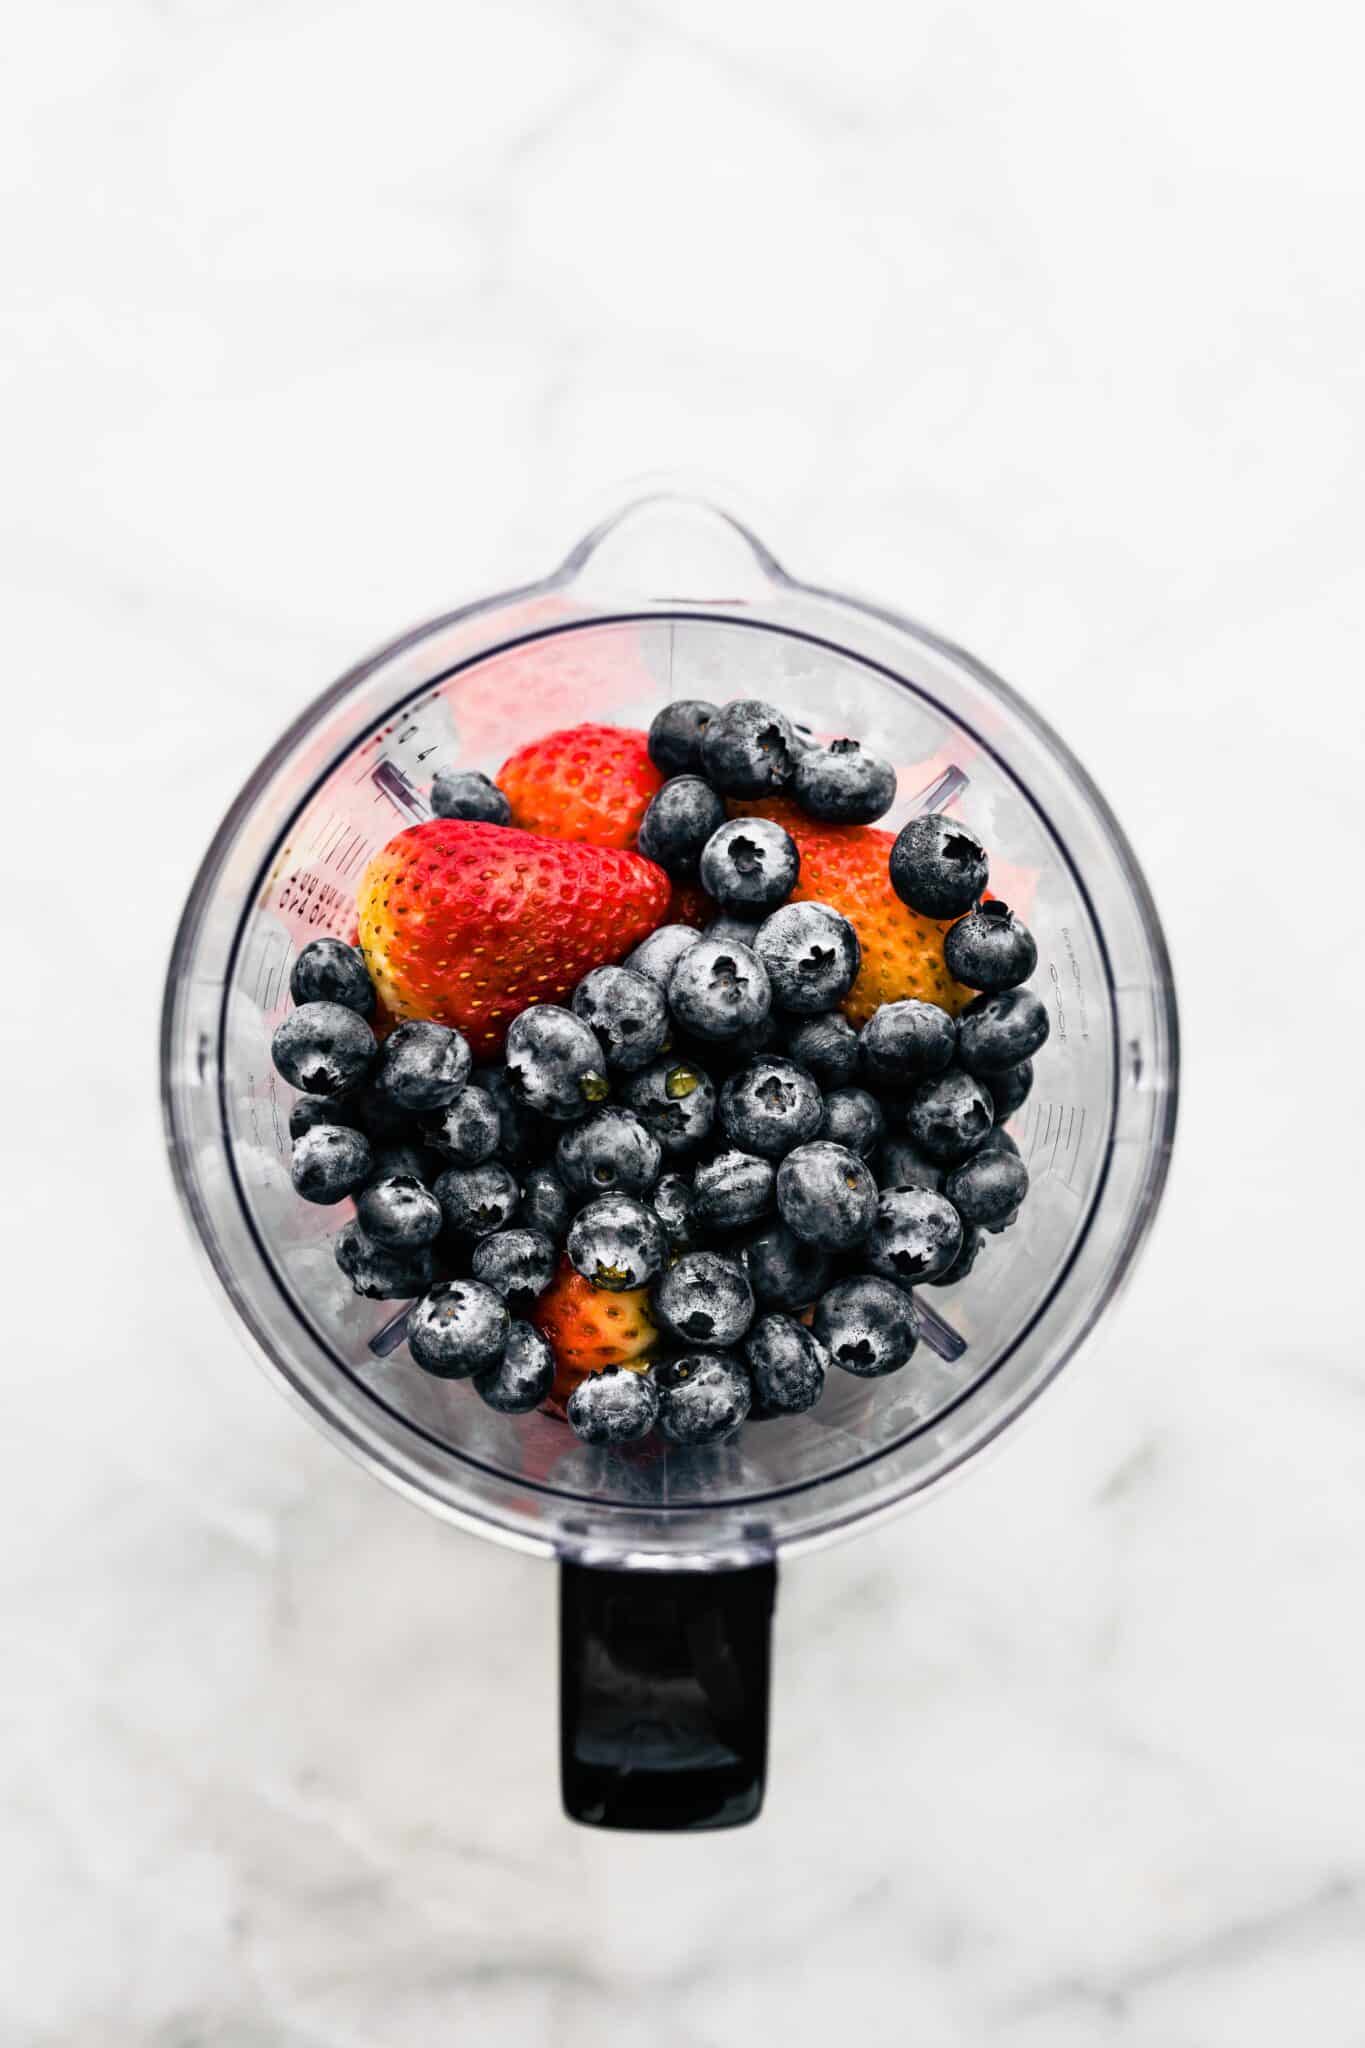
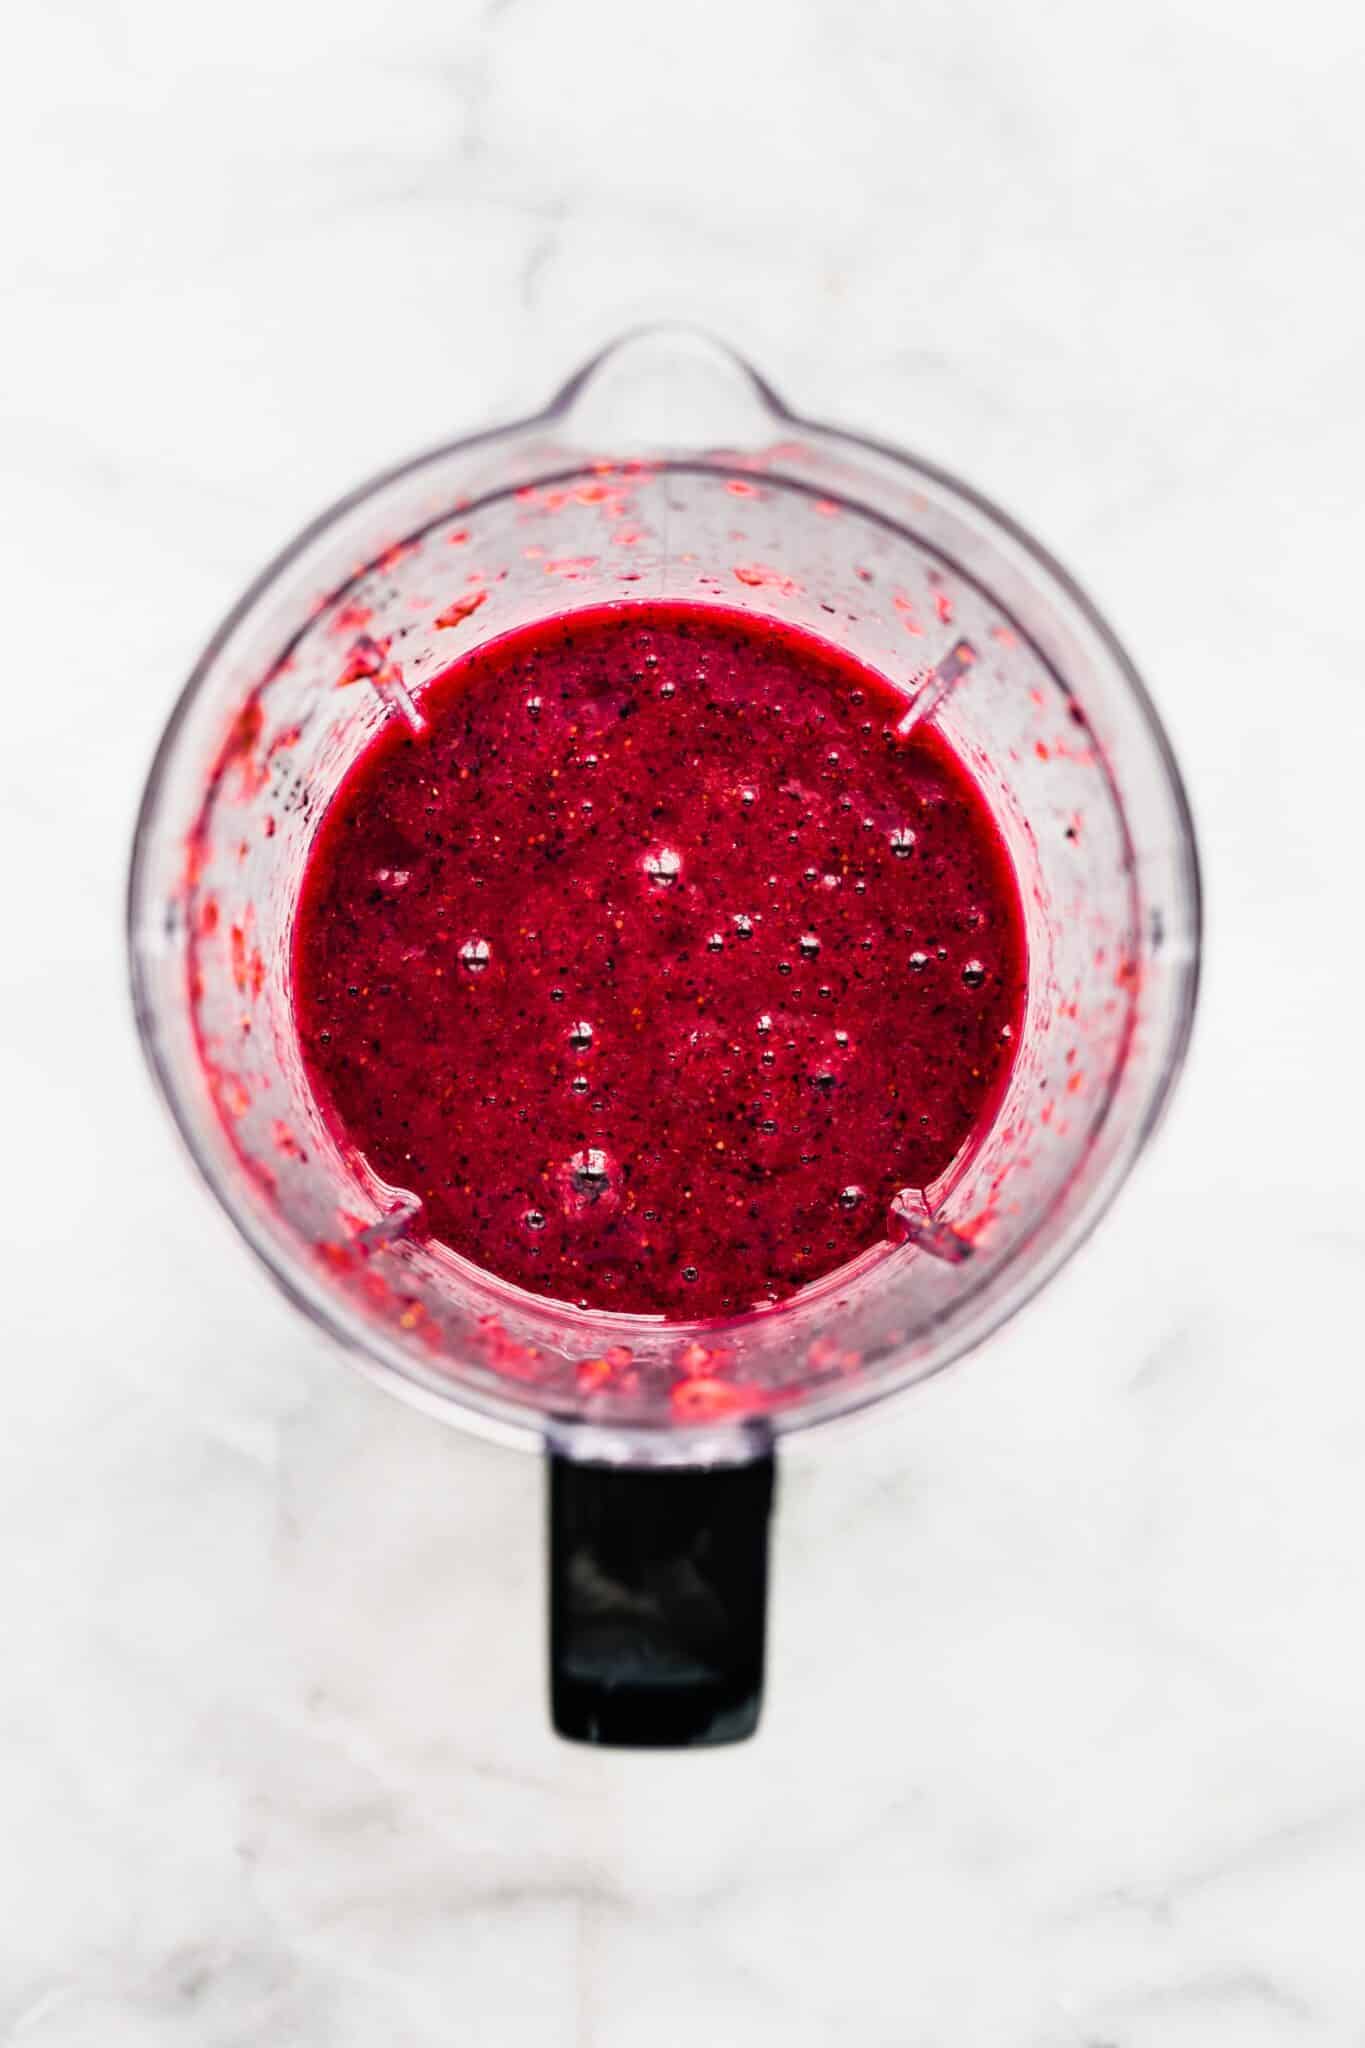
  1. Blend. Add all the ingredients to a blender or food processor, and pulse until smooth. 
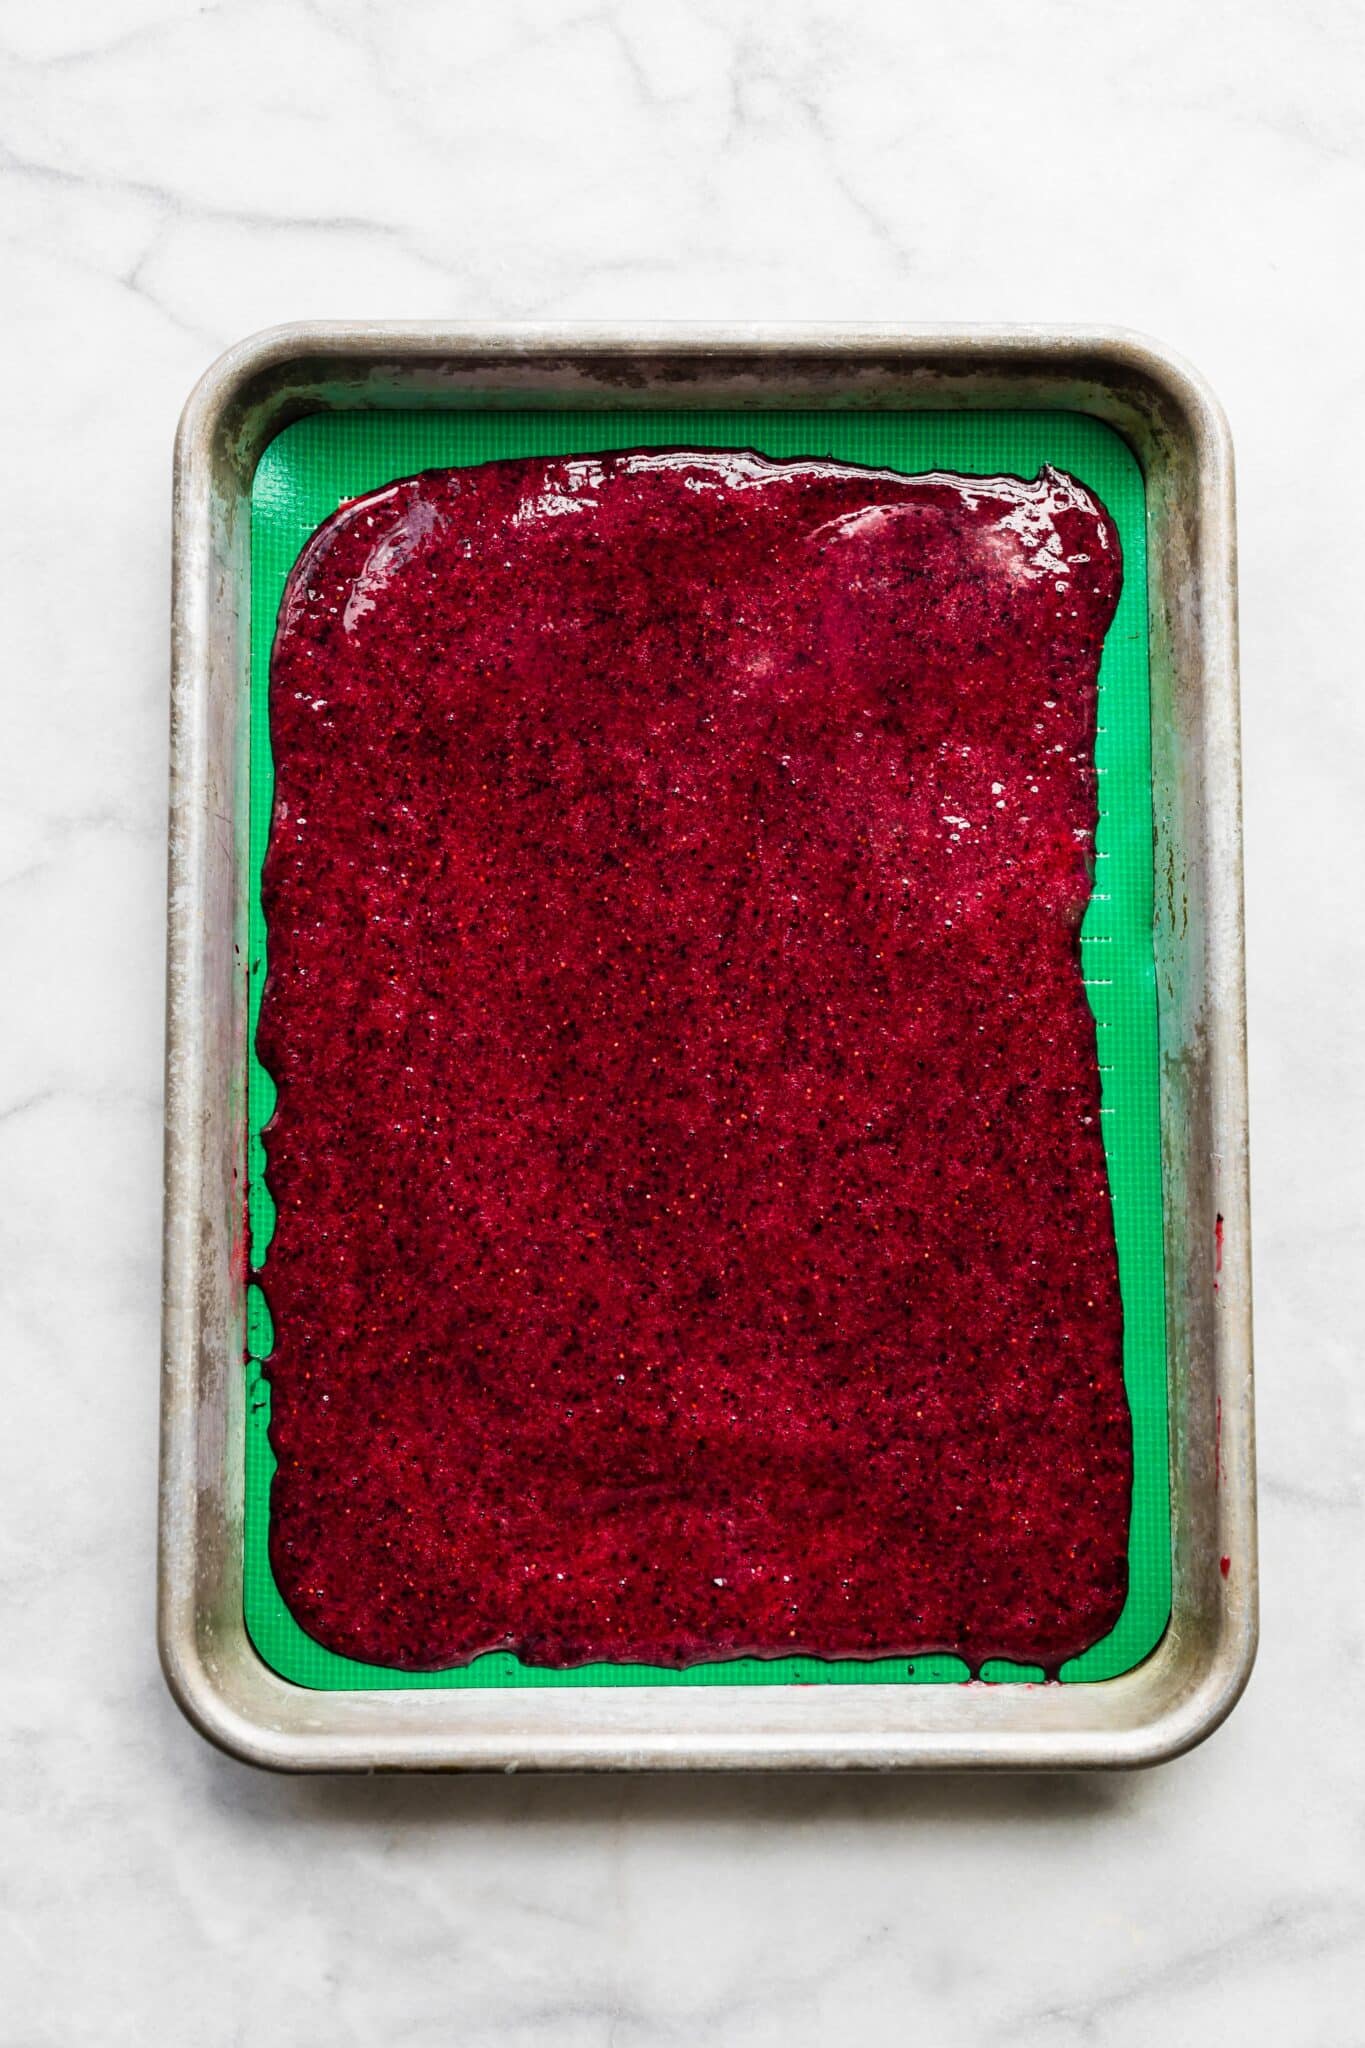
  2. Pour. Transfer the fruit puree to the prepared baking sheet, spreading it out evenly. Use a spatula if needed! 
Pink fruit puree being poured from a blender onto a silpat liner.
Fruit puree on plastic wrap on a sheet pan.
Plastic wrap
Fruit puree on a silpat liner on a baking sheet.
Silpat liner

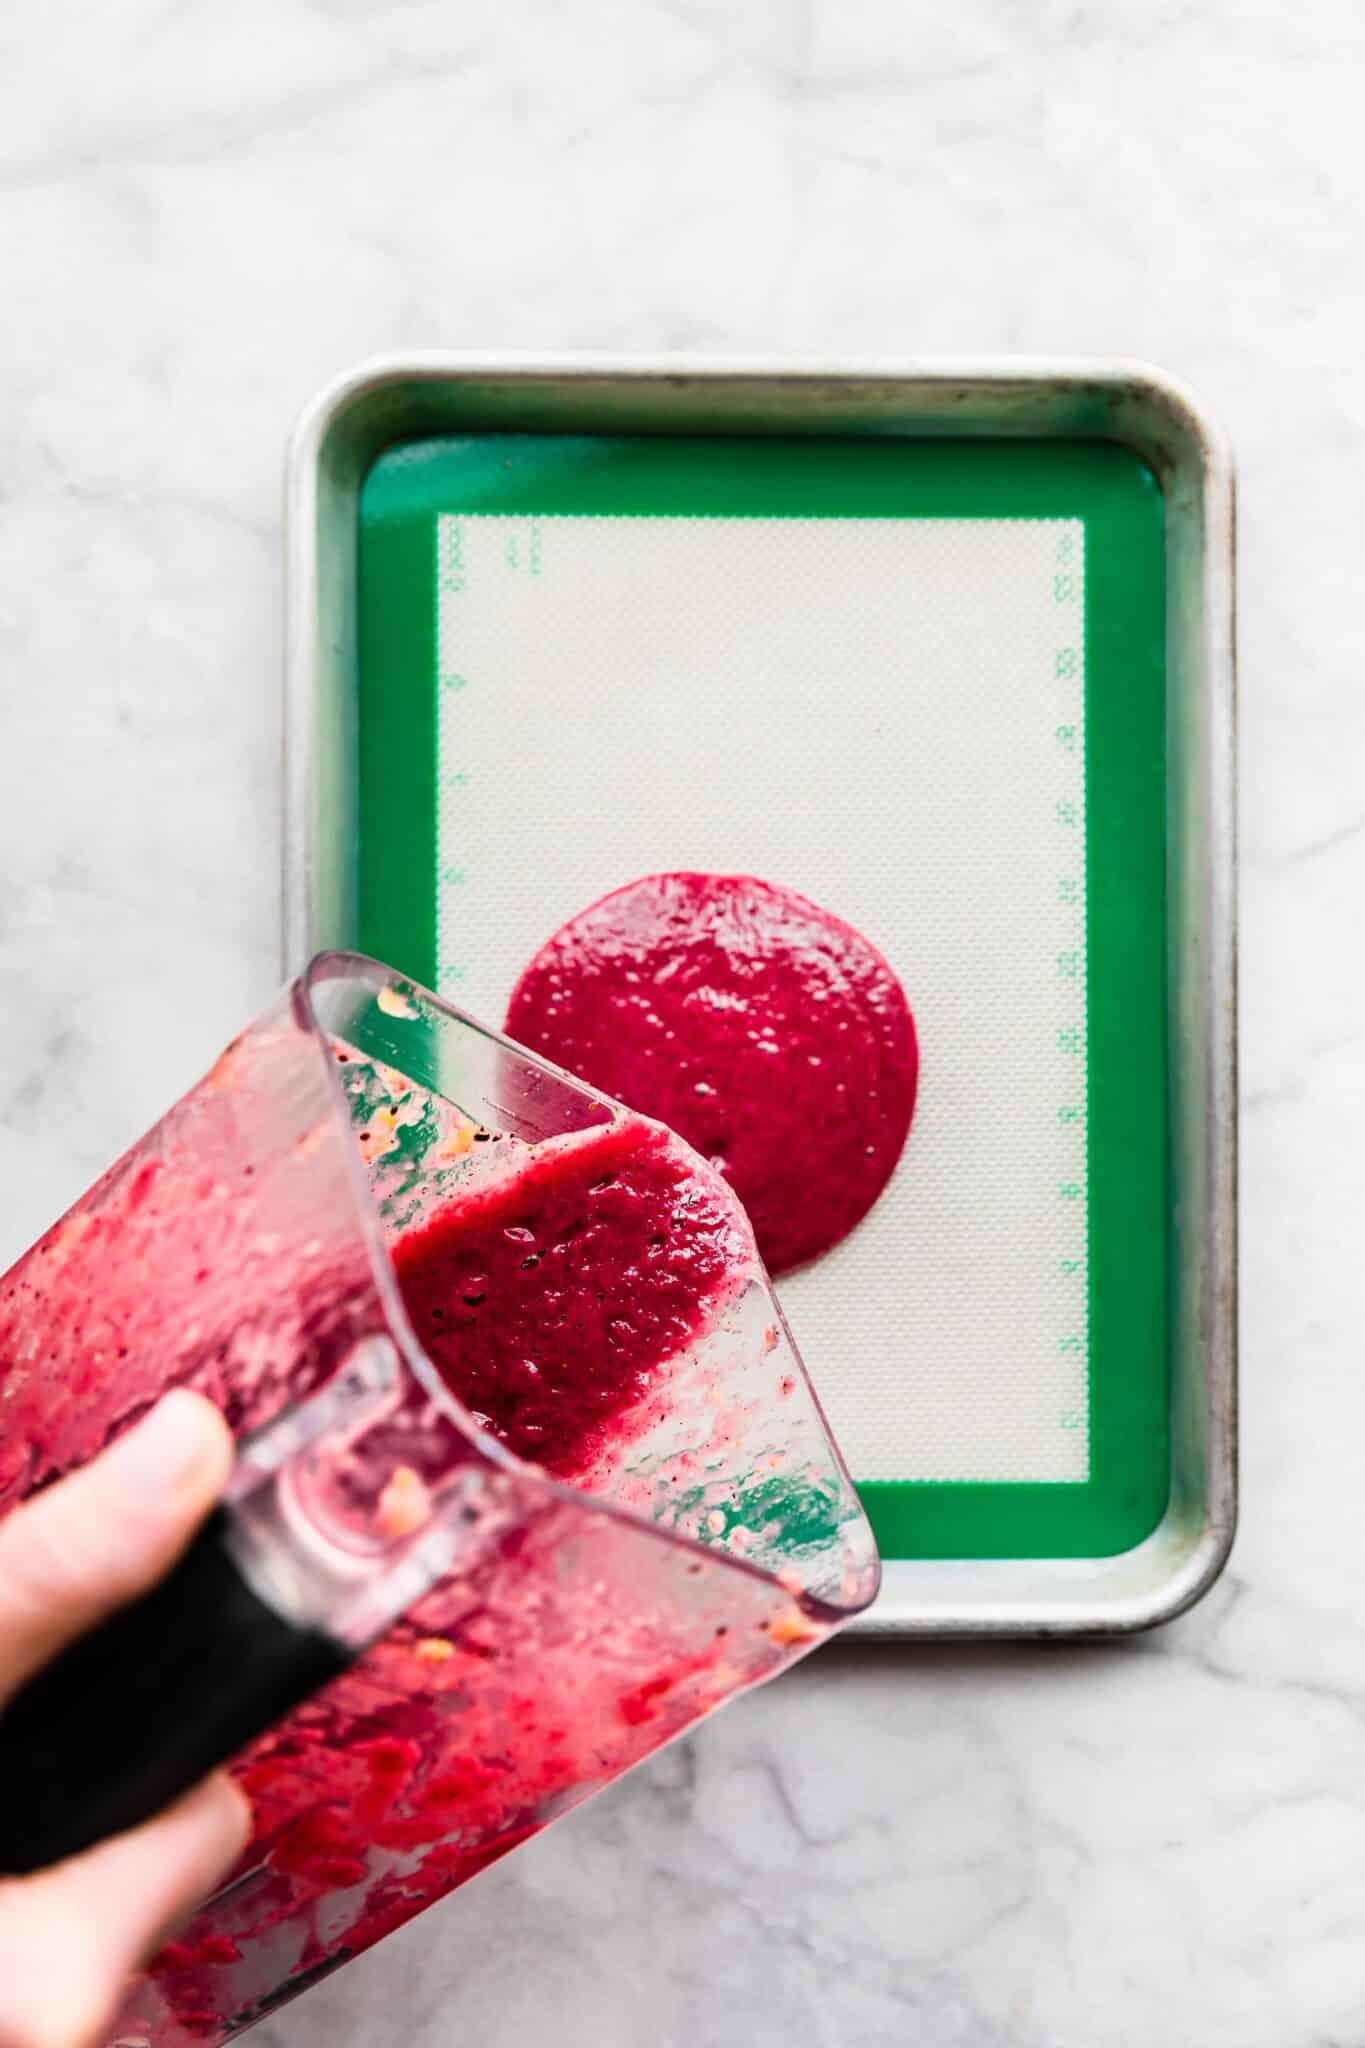
Note: If doubling the recipe, divide the mixture evenly between two half sheet pans. Don’t pour all of it onto one pan, or your roll ups will be too thick to dry out! 

  1. Dry Out. Transfer the mixture to the lowest rack of the oven. Bake at the lowest temperature (mine was 170 degrees Fahrenheit), and bake until the center is not sticky anymore. 
Overhead photo of a woman's hand pulling dried fruit puree from a silpat liner.
A woman's fingers lifting dried fruit puree from a silpat liner.

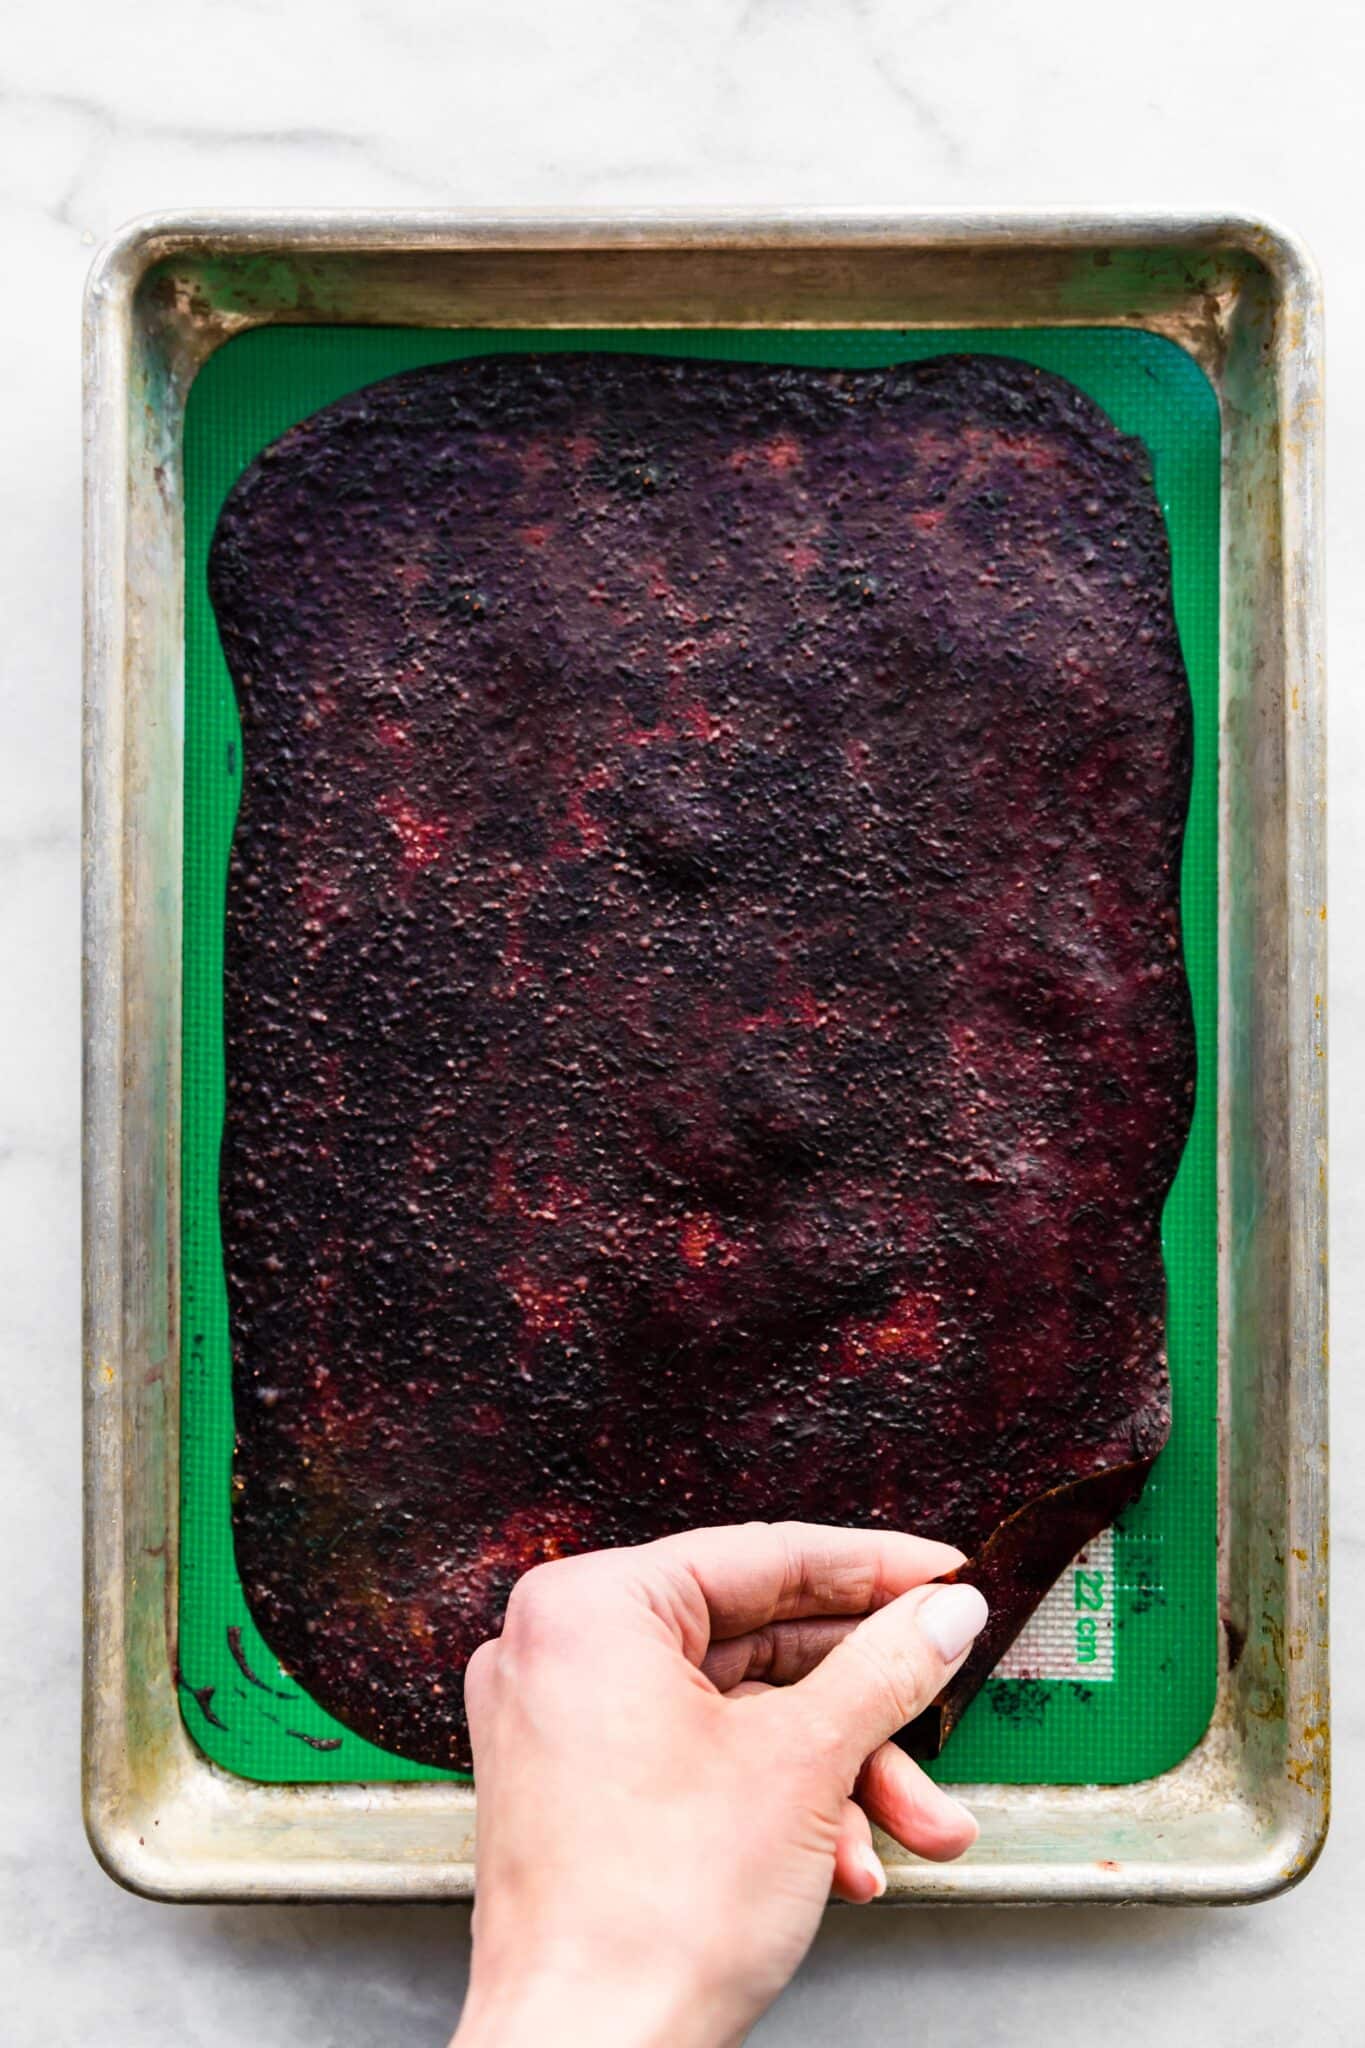
Pro-Tip: Be careful not to use your oven’s warming mode, or your fruit roll ups won’t dry out properly! 

  1. Cool. Allow the mixture to cool on the sheet pan completely. 
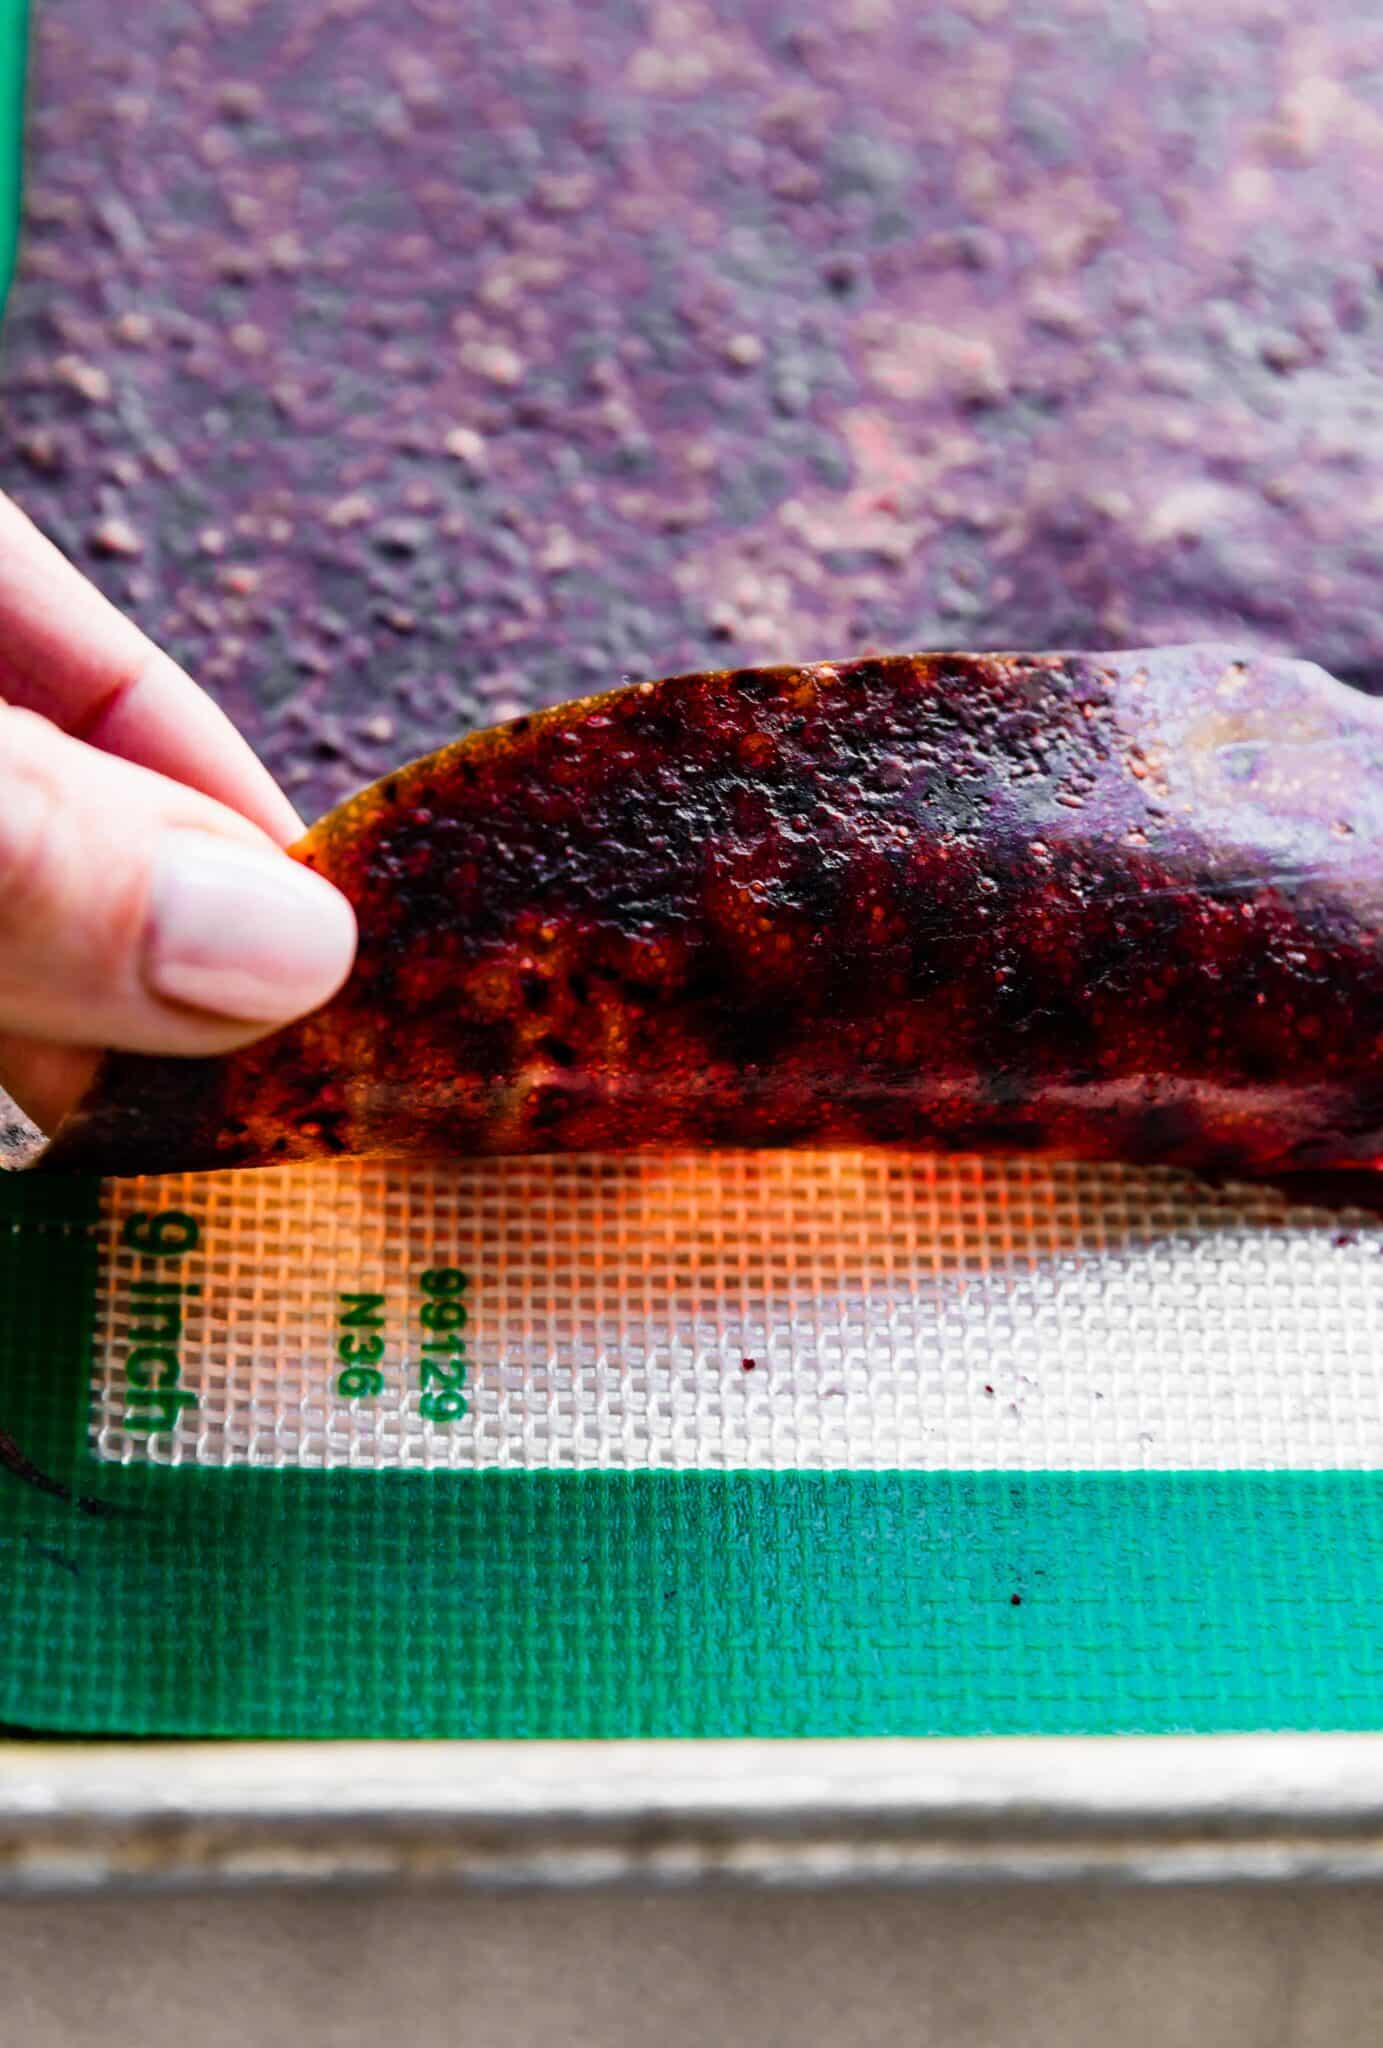
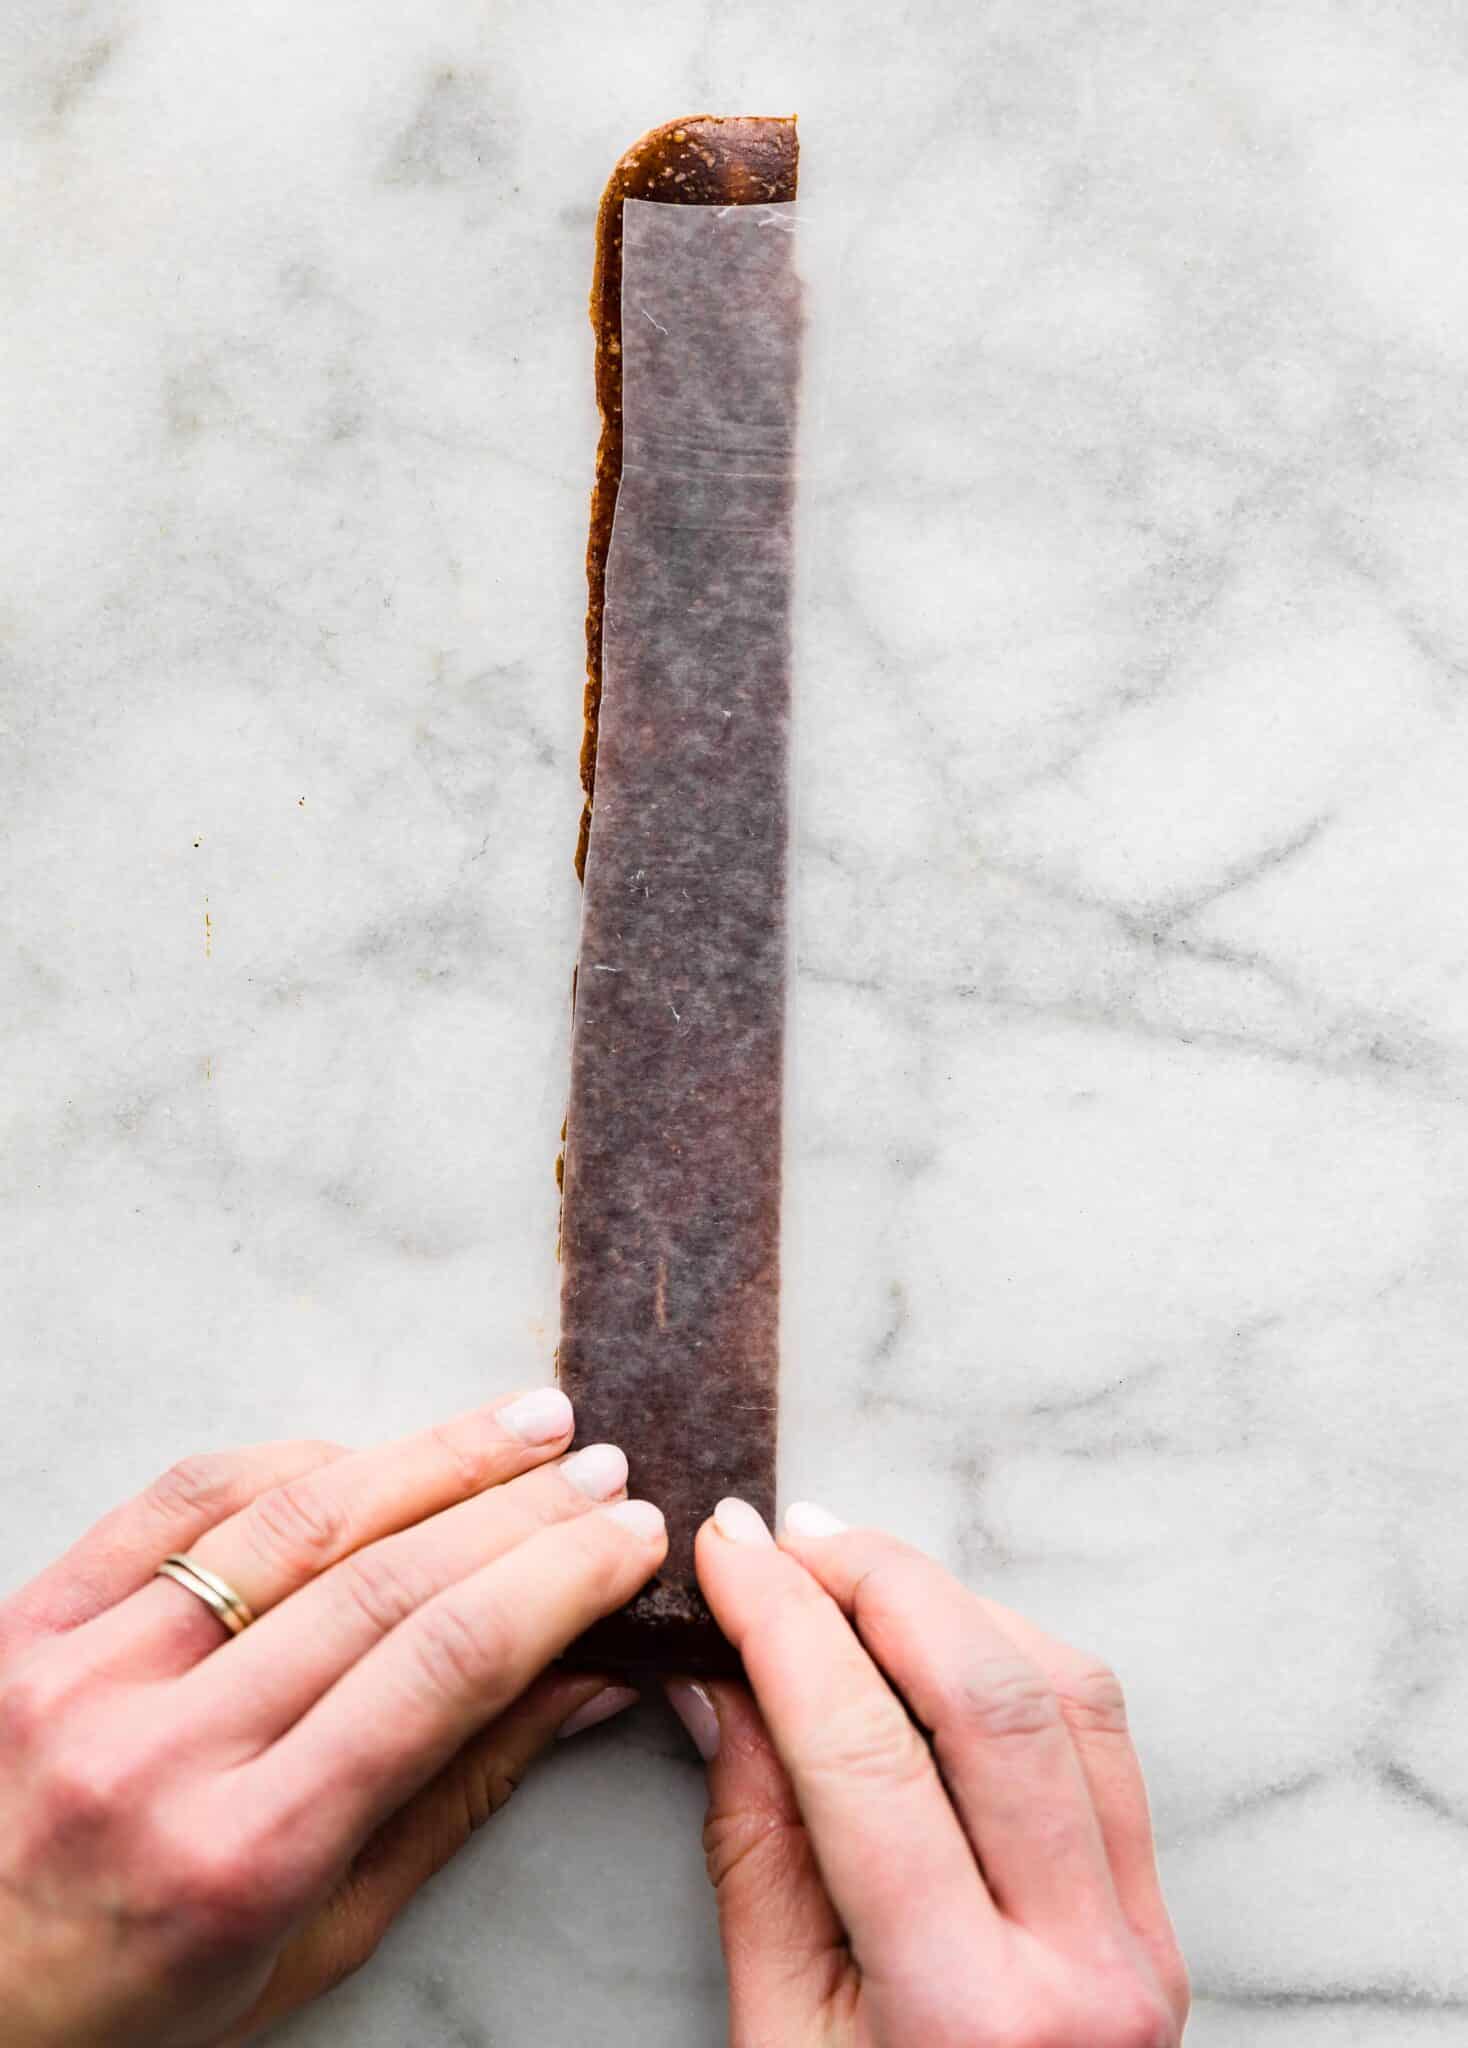
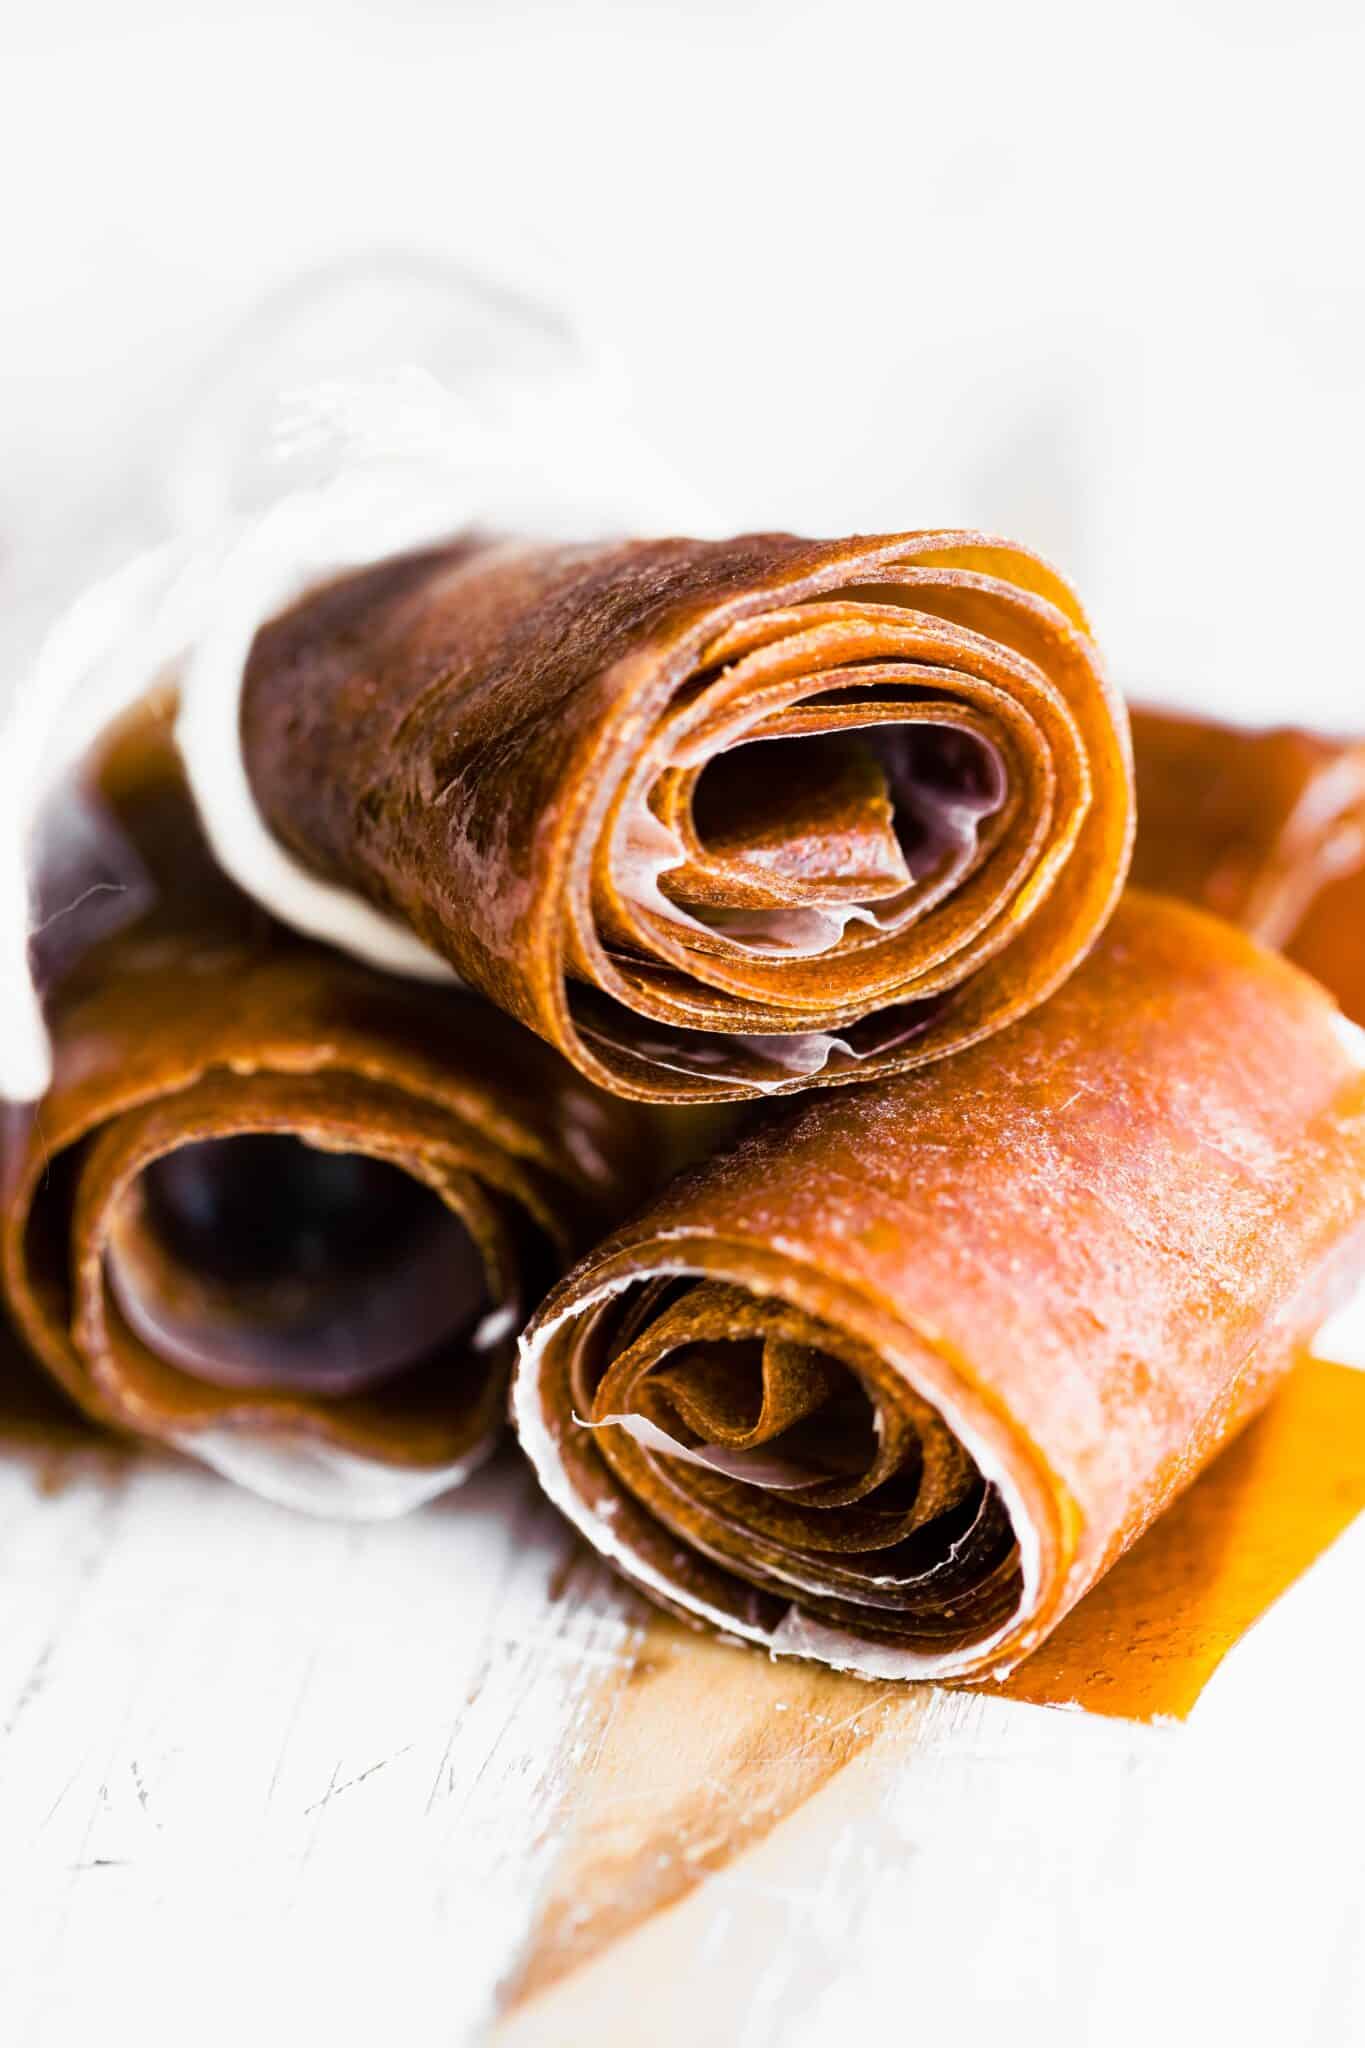
  1. Cut. Peel off the fruit layer, and slice it into long strips. Roll the strips up in parchment paper, and use a string to hold them together. Enjoy! 
A woman's hands rolling up a homemade fruit roll up on strips of parchment paper.
Three fruit roll ups stacked in a pile on a white cutting board.

No Dehydrator? No Problem!

No, this recipe can be made entirely in the oven! However, if you have a dehydrator, it can be used. 

  1. Puree all the ingredients in a blender or food processor. 
  2. Pour the mixture evenly onto a dehydrator tray. 
  3. Cover, and dehydrate at 135 degrees Fahrenheit for five to seven hours. The total time will vary based on your dehydrator and the type of fruit. 
  4. Turn the dehydrator off once the fruit mixture is dry and no longer sticky in the middle. 
  5. Cool completely. Then follow similar directions as the oven method above; slice, roll, and serve. 
Two different colored homemade fruit roll ups on a wooden board.

More of Our Favorite

Gluten-Free Kid-Friendly SnackS

  • Soft Baked Paleo Bars
  • Gluten-Free Cereal Bars
  • Chocolate Almond Butter Cups with Banana
  • Multiseed Homemade Healthy Crackers

Common Questions

How long does this recipe last? 

You can store leftovers in an airtight container or sealable bag at room temperature in the pantry for up to one month. We don’t recommend storing leftovers in the fridge as the fruit rollups tend to become too hard. 

Can I freeze leftovers?

We don’t recommend it! The rolls won’t thaw well and are likely to become mushy and gummy. 

Can I use frozen fruit? 

Fresh fruit is best for this recipe. Frozen fruit will cause the mixture to become too runny and drying times would be altered. Plus it isn’t quite as flavorful. 

Can I use a combination of fruits? 

Absolutely! Feel free to mix and match and flavors you like best. You can also make different flavors for a snack variety pack! It’s the perfect addition to your snack lineup that every member of the family will look forward to eating. 

Can I double the recipe? 

Yes! To do so, double the batter, and evenly spread the mixture onto two half sheet pans. Then, follow the recipe as normal, placing both pans in the oven to dehydrate.

Do I need gelatin for this recipe? 

No, the sweetener acts as a “glue” holding the ingredients and creating a sticky consistency similar to gushers or fruit leather without the need for gelatin or fruit pectin. 

Print
clock clock iconcutlery cutlery iconflag flag iconfolder folder iconinstagram instagram iconpinterest pinterest iconfacebook facebook iconprint print iconsquares squares iconheart heart iconheart solid heart solid icon
Overhead photo of two different colored fruit roll ups.

Homemade Fruit Roll Ups Recipe


5 Stars 4 Stars 3 Stars 2 Stars 1 Star

5 from 7 reviews

  • Author: Lindsay Cotter
  • Total Time: 4 to 6 hours
  • Yield: 8 to 10 roll ups 1x
  • Diet: Gluten Free
Print Recipe
Pin Recipe

Description

Skip the store-bought options, and make this homemade fruit roll ups recipe with just two simple ingredients for a sweet, nutritious snack instead! Gluten-free.


Ingredients

Scale

(see notes if doubling the recipe)

  • 2 cups fruit of choice (300 grams), peeled and sliced, if needed (see notes for best types of fruit to use)
  • 1 to 2 teaspoons honey or maple syrup
  • Optional – 1 Tablespoon fruit juice (such as pineapple or orange juice for extra flavor)

Instructions

Oven Method (See notes)

  1. Puree all ingredients in a blender or food processor until smooth ( (about 1 to 1 ¼ cup pureed). Pour onto a half sheet pan (about 15 x 10 x 1 inch) lined with a silicone baking mat or plastic wrap (do not use aluminum foil, parchment paper, or waxed paper otherwise the fruit roll ups will not peel off). See notes if you double the recipe.
  2. Spread the fruit mix to ⅛ inch thick. Place in the oven at 170F or at the lowest temperature and bake for 6-8 hours, until the center is not sticky anymore. Remove from the oven and allow to cool. (see notes). 
  3. Let the fruit batter cool then peel the fruit off the baking mat or plastic wrap. Place on a sheet of parchment paper and cut into strips with kitchen shears.
  4. Roll the strips up and use a string to hold together or simply press the ends to the parchment paper.
  5. Store in an airtight container for up to 1 month.

Notes

Alternative Method – DEHYDRATOR – Puree all ingredients in a blender or food processor until smooth. Pour evenly onto a dehydrator tray. Cover and dehydrate at 135 degrees Fahrenheit for 5 to 7 hours. Once the batter is dry and not sticky in the middle, turn off the dehydrator. Allow the fruit roll to cool.

Prep Tips – Double the batter and evenly spread onto 2 half sheet pans, if desired.  

Oven Method Tip – Then let the fruit mix dehydrate for 4-7 hours (check progress at 3 hours), depending on the temperature. I was able to dry out the fruit on a silicone mat in 4 hours at 170F but using plastic wrap took an extra 30-45 minutes..  Do not use warming mode on the oven.

Flavor Tips – Each type of fruit will produce slightly different results. Berries, mango, and pineapple are my favorites. If using berries or kiwi, small seeds will remain unless you strain them. Experiment to find what fruit works best for you. The addition of honey or maple syrup enhances the texture and makes the fruit roll ups a little more chewy.

  • Prep Time: 5 minutes
  • Cook Time: 4 to 6 hours
  • Category: snack
  • Method: oven
  • Cuisine: American

Nutrition

  • Serving Size: 1 fruit roll up
  • Calories: 20
  • Sugar: 3.7 g
  • Sodium: 0.4 mg
  • Fat: 0.1 g
  • Saturated Fat: 0 g
  • Carbohydrates: 5.1 g
  • Fiber: 0.6 g
  • Protein: 0.2 g
  • Cholesterol: 0 mg

We have a new cookbook!

Allergy Friendly Recipes for Everyone Around The Table! Order here

1686 shares
  • Share
  • Tweet

Categories: Blender, Dairy-Free, Egg-Free, Gluten-Free, Grain-Free, Nightshade-Free, Nut-Free, Oven, Snacks and Appetizers, Vegan, Vegetarian Tags: dairy free, dehydrator, fruit roll ups, gluten free, homemade fruit rollups, kid friendly, meal prep, snacks, vegan, vegetarian

Two photos with a text overlay for pinterest. Top photo of ingredients for homemade fruit roll ups. Bottom photo of homemade fruit roll ups.
A photo of 2 rolls of homemade fruit leather with a text overlay for pinterest.
butternut squash soup surrounded by pumpkins, thyme, roasted pumpkin seeds, and a spoon

Get Our Free Best-of-Fall Recipe Guide!

Enter your email below and we’ll send it straight to your inbox.

More recipes you’ll love!

Socca cut into 5 pieces
Socca: Gluten-Free Chickpea Flatbread
Baked salt and vinegar kale chips being pulled out of the air fryer
Salt & Vinegar Air Fryer Kale Chips
stack of dried orange slices on white background
Dried Orange Slices
overhead: spoon in the bowl of a food processor, scooping creamy seed butter out
Homemade Sunflower Seed Butter
Two photos with a text overlay for pinterest. Top photo of ingredients for homemade fruit roll ups. Bottom photo of homemade fruit roll ups.
A photo of 2 rolls of homemade fruit leather with a text overlay for pinterest.
Lindsay Cotter of Cotter Crunch

About Lindsay

Hi, y’all, I’m Lindsay Cotter, a Nutrition Specialist with a focus on Gluten-Free eating. I love creating delicious nourishing food that anyone can enjoy.

  • About
  • Studio
  • Shop
  • Subscribe
  • Instagram
  • Pinterest
  • Facebook
  • Twitter
  • YouTube
Two photos with a text overlay for pinterest. Top photo of ingredients for homemade fruit roll ups. Bottom photo of homemade fruit roll ups.
A photo of 2 rolls of homemade fruit leather with a text overlay for pinterest.
21 day anti-inflammatory diet guide

Feel your best—heal with food!

Struggling with inflammation, fatigue, or digestive issues? This 21-day plan gives you a step-by-step guide to help you feel better fast!

Get Started Today!

Have a question? Use ctrl+f or ⌘+f on your computer or the “find on page” function on your phone browser to search existing comments!

Reader Interactions

Comments

    Rate & Comment Cancel reply

    Your email address will not be published. Required fields are marked *

    Recipe rating 5 Stars 4 Stars 3 Stars 2 Stars 1 Star

  1. Avatar photoSarah

    Sep 22, 2020 at 8:19 AM

    The sauce tasted awesome and I was super excited to try them! They weren’t quite done before I went to bed so I left them over night. Woke up to the smell of burnt toast – WARNING! apparently they will burn! I’ve made other fruit leather and didn’t know this was possible so posting as a heads up – don’t leave for more than 12 hours

    Reply
    • Avatar photoLindsay Cotter

      Sep 23, 2020 at 10:31 AM

      Oh good to know, thank you!

      Reply
  2. Avatar photoSkye

    Mar 13, 2020 at 1:28 PM

    Have mine in the dehydrator now! Hope they come out looking as good as the pictures!!

    Reply
    • Avatar photoLindsay Cotter

      Mar 14, 2020 at 1:00 PM

      keep me posted!

      Reply
  3. Avatar photoLaLa

    Sep 12, 2019 at 9:35 AM

    These look amazing! If using the oven method, can you use parchment paper?

    Reply
    • Avatar photoLindsay Cotter

      Sep 12, 2019 at 1:18 PM

      Use a baking sheet lined with plastic wrap, or a silicone baking mat. Don’t use foil, parchment, or waxed paper otherwise it will stick and not peel. Hope that helps!

      Reply
    • Avatar photodani

      Apr 10, 2020 at 8:30 AM

      Hi! Curious if this worked on parchment paper? Hoping to make it today this way.

      Reply
      • Avatar photoLindsay Cotter

        Apr 10, 2020 at 10:23 AM

        Do you mean baking it with parchment paper? I think it might stick to the parchment paper when baking. Do you have plastic or silicon mat?

        Reply
  4. Avatar photosheenam @ thetwincookingproject

    Sep 12, 2019 at 6:34 AM

    Cant believe so easy to make!!! YUM

    Reply
  5. Avatar photoSuzy

    Sep 08, 2019 at 11:25 PM

    This is such a great idea! My kids are going to go crazy for them!

    Reply
    • Avatar photoLindsay Cotter

      Sep 09, 2019 at 7:44 PM

      Yaay! Thanks, Suzy!

      Reply
  6. Avatar photoKari Ani

    Sep 07, 2019 at 3:41 PM

    What do you cover it with in the dehydrator?

    Reply
    • Avatar photoLindsay Cotter

      Sep 07, 2019 at 4:27 PM

      You shouldn’t need to cover it in the dehydrator. Do you have the one with the slots? And the mat to place the batter on? Send me the brand name an I can help! 😉

      Reply
  7. Avatar photoSabrina

    Sep 07, 2019 at 1:49 PM

    thank you for this roll up inspiration! Best of all of knowing what’s in it, as you write, a great idea!

    Reply
    • Avatar photoLindsay Cotter

      Sep 09, 2019 at 7:47 PM

      You’re welcome Sabrina!

      Reply
  8. Avatar photowilhelmina

    Sep 05, 2019 at 12:55 PM

    These are so much better than store bought! My daughter loves helping make them as much as eating them!

    Reply
    • Avatar photoLindsay Cotter

      Sep 05, 2019 at 1:20 PM

      Oh i love that! What a fun mother daughter project. 🙂

      Reply
  9. Avatar photoLauren

    Sep 05, 2019 at 10:22 AM

    Perfect timing! My kids start school this week and this is the perfect snack! Thank you!

    Reply
    • Avatar photoLindsay Cotter

      Sep 05, 2019 at 1:32 PM

      Oh yay! so glad! Keep me posted on how they turn out Lauren!

      Reply
  10. Avatar photoLiz S

    Sep 05, 2019 at 6:52 AM

    These definitely look irresistible and better than the 90’s treat.

    Reply
    • Avatar photoLindsay Cotter

      Sep 05, 2019 at 1:33 PM

      Haha what was that fruit roll up name again? Fruit by the foot? LOL

      Reply
  11. Avatar photomo

    Jul 31, 2016 at 4:27 AM

    I like your site. tanks

    Reply
  12. Avatar photoLauren @ The Bikini Experiment

    Apr 15, 2016 at 7:14 AM

    I absolutely loved fruit roll ups as a kid. So cool I get to revisit them as an adult in a healthy, wholesome version. Thank you. YUM

    Reply
  13. Avatar photoShawna

    Apr 04, 2016 at 9:12 AM

    i love all things kiwi and actually am one of those who eats the kiwis whole, with skin! doesn’t bother me at all.

    Reply
    • Avatar photoCotter Crunch

      Apr 04, 2016 at 1:41 PM

      me too! love that!

      Reply
  14. Avatar photoAbby @ BackAtSquareZero

    Apr 03, 2016 at 6:11 PM

    These look so much better than the junk I ate as a kid!

    Reply
  15. Avatar photoJess @hellotofit

    Apr 03, 2016 at 11:33 AM

    Looks like I need a dehydrator!! hehe. These were one of my favorite snacks growing up, but the ones my dad got for me at the grocery store probably had a ton of added sugar…these look WAY better!

    Reply
  16. Avatar photodixya @food, pleasure, and health

    Apr 02, 2016 at 8:28 AM

    i made avocado mango roll ups long time ago in the oven and it came out good..not great like yours though. you are tempting me to try it again.

    Reply
    • Avatar photoCotter Crunch

      Apr 03, 2016 at 1:06 PM

      Maybe it was the avocado? Is try it without a fat added. Just fruit based. But man does that sound good!!!

      Reply
  17. Avatar photoAlysia at Slim Sanity

    Apr 02, 2016 at 8:17 AM

    OMG Yum! I love this idea. I used to like fruit roll-ups, but I always loved fruit leather that my mom would buy when we were kids. Need to add this to my list for when baby girl can eat solid foods…long ways off since she’s not even here yet but never hurts to start getting ideas early, right? lol

    Reply
  18. Avatar photoKristy @ Southern In Law

    Apr 01, 2016 at 11:02 PM

    These look sooo delicious and so fun! You are too clever, my friend!

    Reply
  19. Avatar photoThalia @ butter and brioche

    Apr 01, 2016 at 10:11 PM

    Fruit leathers definitely take me back to my childhood, I swear I had one most days in my school lunchbox – but never were the flavours as creative and delicious as this!

    Reply
  20. Avatar photoJulia Mueller

    Apr 01, 2016 at 11:42 AM

    Fruit roll ups were my JAM when I was a kid! I’m loving this tropical paradise you’ve got going on. I’d have to make a quadruple batch, because these surely would disappear lickety split in my house. Soooo tempting!

    Reply
    • Avatar photoCotter Crunch

      Apr 01, 2016 at 2:31 PM

      they are quite dangerous but better than cookies, right? LOL!

      Reply
  21. Avatar photoLaura @ Sprint 2 the Table

    Apr 01, 2016 at 10:31 AM

    I saw someone do these in a watermelon flavor once… I didn’t know I could do it in an oven though!!! This is something I can get on board with. Happy Friday!!!

    Reply
    • Avatar photoCotter Crunch

      Apr 01, 2016 at 2:32 PM

      ohh that sounds refreshing. I wonder if kombucha fruit rolls ups would work?

      Reply
      • Avatar photoLaura @ Sprint 2 the Table

        Apr 02, 2016 at 12:28 AM

        GENIUS!!!

        Reply
  22. Avatar photoErin @ Erin's Inside Job

    Apr 01, 2016 at 9:48 AM

    This is the second time I’ve seen a dehydrator in the past few days, which is always something I’ve been thinking about getting. You may have just convinced me!

    Reply
    • Avatar photoCotter Crunch

      Apr 01, 2016 at 2:33 PM

      i think that’s a sign! for sure!

      Reply
  23. Avatar photoErin @ The Almond Eater

    Apr 01, 2016 at 7:10 AM

    Ohhh these sound good. I should probably add dehydrator to things I NEED. We had one at the juice company when I worked there and it was great for making kale chips and dried fruit. Are they expensive?

    Reply
    • Avatar photoCotter Crunch

      Apr 01, 2016 at 7:35 AM

      they are so worth it! you can buy one as cheap at $4o or expensive as $150. TOTALLY put it on your registry!

      Reply
  24. Avatar photoRebecca @ Strength and Sunshine

    Apr 01, 2016 at 6:45 AM

    O that’s fun! I need to dust of my dehydrator!

    Reply
    • Avatar photoCotter Crunch

      Apr 01, 2016 at 7:39 AM

      Um, yes! you have great recipes already so I can only imagine what you’d do with the dehydrator

      Reply
  25. Avatar photoMegan @ Skinny Fitalicious

    Apr 01, 2016 at 6:11 AM

    The alcohol version, now that’s what I’m talking about!

    Reply
    • Avatar photoCotter Crunch

      Apr 01, 2016 at 7:38 AM

      happy hour with kids? kidding. kinda.

      Reply
  26. Avatar photoSusie @ SuzLyfe

    Apr 01, 2016 at 5:36 AM

    I love adultifying childhood favorites. Love the flavors here, you certainly wouldn’t have gotten those with kid fruit roll ups!

    Reply
    • Avatar photoCotter Crunch

      Apr 01, 2016 at 7:38 AM

      haha no, i think i got the starbust kind growing up

      Reply
  27. Avatar photoMichele @ paleorunningmomma

    Apr 01, 2016 at 5:18 AM

    Boozy fruit roll ups sounds genius 🙂 I really need to get a dehydrator! In all seriousness, my kids would flip if we made these, I would win mom of the year 🙂

    Reply
    • Avatar photoCotter Crunch

      Apr 01, 2016 at 7:37 AM

      Totally! you can make in oven too though. Hope you are feeling better

      Reply
  28. Avatar photoBlair

    Apr 01, 2016 at 5:11 AM

    Oh, my fruit snack-loving children would adore these! That combination of flavors sounds delicious, too! 🙂 Real fruit is always better!!!

    Reply

Primary Sidebar

Two photos with a text overlay for pinterest. Top photo of ingredients for homemade fruit roll ups. Bottom photo of homemade fruit roll ups.
A photo of 2 rolls of homemade fruit leather with a text overlay for pinterest.
Lindsay Cotter of Cotter Crunch

About Lindsay

Hi, y’all, I’m Lindsay Cotter, a Nutrition Specialist with a focus on Gluten-Free eating. I love creating delicious nourishing food that anyone can enjoy.

  • About
  • Studio
  • Shop
  • Subscribe
  • Instagram
  • Pinterest
  • Facebook
  • Twitter
  • YouTube
Two photos with a text overlay for pinterest. Top photo of ingredients for homemade fruit roll ups. Bottom photo of homemade fruit roll ups.
A photo of 2 rolls of homemade fruit leather with a text overlay for pinterest.

Trending Now

  • overhead photo: large pot of peanut stew; wooden spoon stirring fresh herbs inAfrican Peanut Stew
  • Nomato sauce in a blue and white bowl with a spoon.Nomato Sauce (Tomato Sauce Alternative)
  • Overhead photo of a woman's hand picking up a slice of cheese pizza.No-Yeast Gluten-Free Pizza Crust
  • overhead photo: pie pan with paleo sweet potato pecan pieCrustless Sweet Potato Pie
  • A grid of 6 photos of gluten-free Thanksgiving recipes. Green bean casserole, roasted turkey legs, dinner rolls, mushroom gravy over mashed potatoes, jalapeno mac and cheese, and roasted leeks and potatoes.Gluten-Free Thanksgiving Recipes
  • A photo collage of 6 photos of anti-inflammatory foods with a text overlay.Anti-Inflammatory Diet Meal Plan

Recipes by Diet

  • Dairy-Free
  • Egg-Free
  • Gluten-Free
  • Grain-Free
  • Low-Carb
  • Nightshade-Free
  • Nut-Free
  • Vegan
  • Vegetarian
  • Whole30

Recipes by Method

  • Air Fryer
  • Blender
  • Instant Pot
  • No-Bake
  • Oven
  • Slow Cooker
  • Stovetop

Recipes by Type

  • Breakfasts
  • Casseroles
  • Condiments
  • Desserts
  • Drinks
  • Main Dishes
  • Sides & Salads
  • Snacks & Apps
  • Stews & Soups

Resources & More

  • Meal Plans
  • Nutrition Guides
  • How-To
  • Quick Meals
  • Videos
  • Round Ups
  • GF Start Here
  • Anti-Inflammatory
Two photos with a text overlay for pinterest. Top photo of ingredients for homemade fruit roll ups. Bottom photo of homemade fruit roll ups.
A photo of 2 rolls of homemade fruit leather with a text overlay for pinterest.
  • Instagram
  • Pinterest
  • Facebook
  • Twitter
  • YouTube
Cotter Crunch
  • About
  • Studio
  • Shop
  • Subscribe

© 2025 · Cotter Crunch · Disclaimer & Terms · Privacy Policy · Contact

Two photos with a text overlay for pinterest. Top photo of ingredients for homemade fruit roll ups. Bottom photo of homemade fruit roll ups.
A photo of 2 rolls of homemade fruit leather with a text overlay for pinterest.
1686 shares